(Image copyright P.Scott)
|
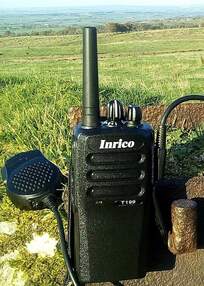
Inrico T199 GSM/WCDMA/3G/WiFi
Network Radio Transceiver |
Inrico T199 16 channel handheld network radio
Specifications:
Model : Inrico T199
CPU : ARM Cortex
CPU Frequency : 1 GHz
Platform : Microtek MTK 6572A
Operating System : Android 4.4.2
Controls:
: PTT button,
: 2 x function buttons,
: Rotary channel selector,
: Rotary power on/off + analog hardware volume control.
External antenna connection type: SMA-reverse
External antenna : GPS Band G+ : GSM850 : GSM1900 : WCDMA850 : WCDM1900 : WCDMA2100
Antenna gain : 2.15dBi
RF Network Support : GSM900/1800 : WCDMA900/2100 (Europe) : GSM850/1900 : WCDMA850/1900 (USA & Canada)
Receive sensitivity : GSM 850/900/1800/1900 <= -108dBm : WCDMA850/900/1800 <= 107.5dBm : WCDMA2100 <= -106.7dBm
RF emission test data : 850MHz : 1800/1900MHz
824.2 - 848.8MHz : Bandwidth = 248kHz : RF output = 995.4mW : Angle modulated, phase modulation (248KGXW)
824.2 - 848.8MHz : Bandwidth = 255kHz : RF output = 397.2mW : Angle modulated, phase modulation (255KG7W)
824.2 - 848.8MHz : Bandwidth = 4.17MHz : RF output = 126.8mW : Angle modulated , straight FM (4M17F9W)
1.8502 - 1.9098MHz : Bandwidth = 245kHz : RF output = 387.3mW : Angle modulated, phase modulation (245KGXW)
1.8502 - 1.9098MHz : Bandwidth = 259kHz : RF output = 151.7mW : Angle modulated, phase modulation (259KG7W)
1.8502 - 1.9098MHz : Bandwidth = 4.36MHz : RF output = 107.6mW : Angle modulated, phase modulation (4M36F9W)
WiFi : 802.11 b/g 2.4 GHz ISM band and 802.11n 5GHz Band A
WiFi Hotspot: 802.11 b/g 2.4 GHz ISM band
Bluetooth : V2 (2.4GHz ISM band)
GPS: internal GPS antenna
Speaker : 40mm diameter internal speaker
AF Output : 2W @ Max 10% distortion
Earphone : 2.5mm jack socket
External Mic : 3.5mm jack socket
USB on Radio : Micro USB 5-pin socket (for data cable for PC control/programming and charging)
USB on Battery : Micro USB 5-pin socket (for +5V DC direct battery charging)
Battery : BL-10G Li-Ion 3.7V 4,000 mAh / 14.8Wh
Charger : Input 100-240V AC 50/60Hz 150mA : Output +5V DC 1A
Weatherproofing : IP54 (IP67 optional)
Size : 59mm x 37mm x 117mm
Weight: 220g
The Inrico T199 network radio transceiver is a hand held portable 'screenless' network radio device with programmable rotary channel selection knob, side mounted PTT button, two programmable function buttons, 'dual port socket' for external speaker-mic or separate external headphone & mic.
The external GSM/3G antenna works well. The antenna can be replaced with a high gain antenna to extend operating range.
Initial range tests have proved the T199 WiFi connection operates well over about 3/4 of the distance the T320 WiFi with no drop outs. (both radios tested from the same locations to the same host access point in identical weather/propagation conditions)
The 3G data connection has performed well 4.5 miles from nearest network cell tower using standard external antenna.
note: I have operated the T199 at a range of 8.5 miles from cell tower using an external 9dBi antenna with good results.
The internal microphone provides very good quality audio with relatively high sensitivity and good frequency response.
Comparative testing using a Baofeng UV5R speaker mic worked well giving clear speech but narrower frequency response and a lower audio level than the internal mic. (4dB to 5dB difference) The internal mic picked up less background and wind noise than the Baofeng UV5R external speaker mic.
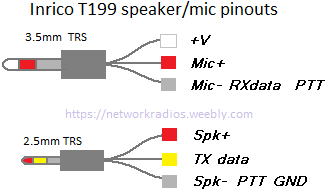
Inrico T199 speaker/mic connection
The T199 speaker / mic sockets are under a protective rubber flap on the side of the radio. The rubber cover is opened by pulling out the top edge. It can then be rotated 180degrees (so it points downwards) and a speaker mic, wired headset or wired earpiece can then be plugged in. Speaker mics/headsets/earpieces that work on a Baofeng UV5R will also work on the T199
For users who wish to wire up other speaker / mic / PTT controls or attach other external hardware see wiring information below.
Caution ! Tip of 3.5mm jack is +5V DC. double check your wiring before plugging the jacks in to avoid damaging the radio or external mic/speaker.
For users who wish to wire up other speaker / mic / PTT controls or attach other external hardware see wiring information below.
Caution ! Tip of 3.5mm jack is +5V DC. double check your wiring before plugging the jacks in to avoid damaging the radio or external mic/speaker.
(Image copyright P.Scott)
Setting up the Inrico T199
The following procedure will help You to connect your Inrico T199. This will also work for other Screenless Network Radios with slight variations like, On the T199 the USB port is on the side under a rubber flap, The T192 USB port is hidden inside the radio's battery compartment.
The hardware rotary channel selector programming procedure is the same for Inrico screenless radios and Boxchip radios with rotary control.
The hardware rotary channel selector programming procedure is the same for Inrico screenless radios and Boxchip radios with rotary control.
You will need a standard 'Micro USB to USB type A fully wired DATA cable' to link the T199 to a PC USB port.
The first thing to do is make sure Your T199 battery is fully charged.
When charging is completed the LED on the desktop charger will show steady Green, turn off the power supply to the charger and remove the T199 from the charger unit.
If You are charging the battery using a micro USB cable plugged directly into the socket on the bottom of the battery You will see a red LED on the base of the battery while charging, this will change to GREEN when the battery is fully charged.
Download an Android remote control program to your computer such as Total Control. - click HERE to go to sigma-rt website -
If You already have experience with another Android remote control program (such as Vysor) You could use that it if You prefer it.
You can download the current 'latest version' of Zello as an Android APK file from Zello.com onto your PC.
NOTE: If You want to use a specific version of Zello (APK files available from APKmirror)
: I use Zello V4.20 on All my Network Radios including T199 which works reliably with this version. If You have Playstore installed in Your T199 Make sure You have turned OFF auto update apps in the PlayStore to ensure Your T199 is NOT automatically updated to latest version. I have found that V4.20 is the most stable with lower latency and less drop outs than newer versions. Some functions have also been removed from newer versions.
If You use a new version or allow apps to be auto updated You will find some functions and features shown here changed and some completely removed.
Now You can connect Your PC to the T199 using the micro USB cable.
The USB data port is under a protective rubber flap on the side of the T199.
The USB port on the bottom of the battery is for battery charging only.
WARNING The T199 USB data connection defaults to 'File transfer mode' with 'USB debugging' turned ON.
DO NOT change USB mode on screenless radios!
DO NOT turn off USB Debugging on screenless radios.
If You have turned off USB Debugging You will have to Flash the userdata and scatter file to return the T199 to correct default settings and then be extra careful not to change USB settings on screenless radios.

|
|
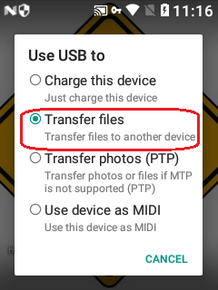
This step is Only for devices With A Screen Display
Do NOT touch USB mode settings on screenless devices. If You wish to use Total Control on an Android device that has a built in screen (TM-7, T320, RT4 or other Android devices) Most devices with screens will default to 'USB Charging Mode' and You will need to manually change the USB mode to 'File Transfer Mode'. On Android devices with a built in screen (T320 shown here) drag down from the top of the screen to see Your notifications. Tap the USB mode notification, (ringed with red line on image 1) Select 'Transfer Files' (ringed with red line on image 2) |
With the Network Radio/Android Device connected to your computer using the micro-USB data cable,
Run the Total Control software on Your PC.
The Total Control program will show the T199 as a New device.
Select the New Device when prompted and the Total Control program will install the Android Total Control app into the T199 automatically.
Follow the on screen prompts in Total Control window to set up Your T199 display on the PC.
On Your PC, Find the Zello apk file You want to install on the T199, This makes it easy to try various versions to find what works best for You.
Simply 'Drag and Drop' the Zello apk file into the T199 device screen on the PC.
Total Control will copy the apk file into the T199 and install it automatically.
At this point You will need to go into the Android Settings on the T199 screen window and setup Your WiFi connection.
You can use the T199 on WiFi only if You wish but If You have installed a SIM card You also should set it up now.
With the T199 connected to the internet via WiFi or 3G data connection You can click on the Zello icon on the T199 screen window and login to the Zello account You wish to use on the T199. (I recommend setting up a new account specifically for the T199)
The first thing to do once logged into Zello is to set Your status to SOLO mode.
If You have not already added the channels You wish to use on this Zello account, use the 'find a channel' feature to add channels to Your channel list. See the Network Radios Channels page for complete list of channels that are part of the 'official' Network Radios channel suite.
Programming channels on the hardware rotary channel selector
The Inrico T199 'screenless' hand held network radio has a rotary channel selector knob located on top of the radio.
To map the Network Radios suite of channels to channel positions on the hardware channel selector follow the procedure below.
Click on the Zello icon on the T199 screen display, log into Zello on the account You wish to use on Your T199.
Open the "Channels" tab and select the channel you want to map to the hardware rotary channel selector control.
Use the down arrow at the right hand side of channel name, select the "Rename channel" function.
Add a two-digit number and a space at the beginning of the channel names.
EG; To put "Network Radios" channel on position 1 of rotary knob rename it "01 N.R. Zero"
Repeat the above steps for each of the channels you want to use on the rotary channel selector knob.
EG; To put "Network Radios CH 01" on rotary selector knob position 2 rename the channel as "02 N.R. One",
To add contacts to the rotary channel selection knob, select the "Contacts" tab,
choose the contact You want to use and rename the contact with two digit number and a space at beginning of it's name.
Make sure you do Not duplicate channel numbers or contact numbers.
You can only have one of each number 01 to 16 to correspond with the 16 positions on the rotary channel selection knob.
Go BACK out of the channels / contacts tab so You see the 'Recents', 'Contacts' and 'Channels' tabs then test the rotary channel selection knob. The T199 will change the Zello app to the selected channel and the programmed channel name will be 'spoken' by the synthesized voice when each channel is selected.
At this point You should go through the Android settings and turn off notifications and features You do not need.
EG: In Zello menu, Options, History. Clear the checkbox for 'Keep message history'.
You can also adjust Your Audio settings while You have the T199 'screen' on your PC display.
The T199 microphone is surprisingly sensitive, If You normally operate hand held radios close up You will need to reduce the mic gain by turning down the 'Recording Amplifier' setting in Zello menu, Options, Audio so You do not transmit distorted audio due to 'over driving' the mic.
(I also clear the check boxes for 'automatic' and 'Noise Suppression')
When adjusting Your audio go to the 'contacts' tab and select the 'Echo' contact.
Use this Echo test service to test Your audio making sure You hold the radio in the position You will normally operate it.
Adjust Your 'recording amplifier' setting until You have clean, clear audio with no wind noise or distortion.
You can now Exit the Total Control program and unplug the USB cable.
You should now be able to use the rotary channel selector on the T199 to select the programmed channels.
NOTES:
When re-naming the channels You may wish to shorten the names. I have used "01 N.R. Zero.", "02 N.R. One." etc..
I have re-named the "Echo" test service in the Contacts list as "16 Test" When I power up the T199 I wait a minute or so after hearing the 'Searching Networks' speech followed by the tone that lets You know it has connected. I then select channel 16, press the PTT and make a short test transmission. The "Echo" service replays my transmission back to me confirming that Zello is indeed connected and ready for use. I then select the channel I wish to operate on using the rotary channel selector.
The above programming procedure also works for programming the hardware channel selector knob on Boxchip Network Radios Devices.
Zello settings on the T199
Setting up Zello on Inrico T199 handheld network radio for easy operation with only the useful tones,
(no annoying beeps) and minimal data use (no point receiving text messages or images)
Zello settings
You will find other settings on Your devices that are not listed here. This is Not a full settings list for every device,
just a few notes from my own working settings running Zello V4.2 (stable, low latency) on Inrico T199 (Android 4.4.2)
This configures Zello to minimise data use and only use Alert tones that are useful for normal operation.
These settings are my own preference and may not suit everyone but are certainly a good starting point.
=========================================================
Zello / Options / Appearance
Language English (auto is default)
Theme Black (black is default)
ON Lock screen orientation (on is default)
OFF Show audio level meter (on is default)
=========================================================
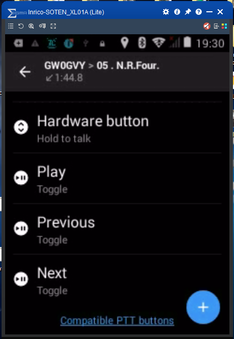
Zello / Options / Push-to-talk buttons
Screen Button: Set to Toggle (handy for operation when connected to PC)
VOX button: Set to Hidden (VOX causes more trouble than it is worth and is best left hidden to stop accidental use.)
Hardware button: Set to Hold to talk (Normal PTT button operation)
Note for bluetooth media button users: use the + (add button) function to select PTT on blutooth device. I use a 5 function media button, +vol and -vol adjust audio volume by default without any setup. I use the remaining 3 buttons for PTT toggle controls.
PLAY: set to Toggle
Previous: set to Toggle
Next: set to Toggle
=========================================================
Zello / Options / Behaviour
ON Start Zello when power on
Auto activate contact [ set to Never ]
ON Do not lock screen during conversation
OFF Set Zello status to Busy when in silent mode
OFF Set Zello status to Available when PTT button is pressed
OFF Save photos taken with system camera
OFF Use system camera to take photos
PUSH NOTIFICATIONS
ON Start Zello on incoming voice message
OFF Display call alerts
OFF Display channel alerts
OFF Display image notifications
OFF Display location notifications
OFF Display text notifications
WORKING IN BACKGROUND
ON Wake up device to keep Zello connected
=========================================================
Zello / Options / History
OFF Keep message history
=========================================================
Zello / Options / Alerts
Note: the alerts I have set to Custom below are using custom alert tones instead of the default Zello tones, Custom tones are available to download [ HERE ] if You wish to use them. If You do not want to use Custom tones simply set the Alerts shown below as Custom to Default and it will use the standard Zello tones.
Ready to send: Custom
Talk button up : Custom
Deliery Delayed : Default
Incoming message : None
End of incoming message : Custom
Missed message : None
Call Alert : None
Channel Alert : None
Image: None
Location: None
Text message: None
Channel text message: None
Default contact selected: None
New conversation: None
Connection lost: Custom
Connection restored: Custom
Error: Default
VIBRATE
OFF Ready to send
OFF Incoming message
OFF Missed message
VISUAL ALERTS (When in the background)
OFF Incoming voice message
OFF Incoming image
OFF Incoming call alert
OFF Incoming channel alert
OFF Incoming location
OFF conversation
OFF Incoming text message
OFF Incoming channel text message
=========================================================
Zello / Options / Audio
Playback Amplifier [Received AF gain]
OFF Automatic
Recording amplifier [Mic Gain]
OFF Noise suppression [Do not use with noise cancelling audio devices]
OFF Apply audio mode only when a message is sent or played (Set to ON to conserve bluetooth headset battery)
OFF Record high quality bluetooth audio (Set to ON if You intend to use bluetooth audio devices)
OFF Voice recording compatibility mode. (Only turn this on if outgoing messages sound too slow or too fast.)
Legacy bluetooth mode: Set to AUTO
=========================================================
Zello / Options / Restrictions
OFF Show trending channel list:
OFF Show incoming contact requests
OFF Allow adding channels
OFF Allow adding contacts
OFF Allow creating new accounts
OFF Allow sending and receiving images
OFF Allow sending and receiving texts
OFF Show profile images
=========================================================
Zello / Options / Support / Advanced settings
CALL SETUP
ON Enable asynchronous message delivery
ON Enable call pre-setup
NETWORKING MOBILE
Keep alive interval [ default 140sec : lower values can improve connection stability. I use 80sec ]
OFF Use TCP only
NETWORKING (WIFI)
Keep alive interval [default 140sec : lower values can improve connection stability. I use 110sec]
OFF Use TCP only
(no annoying beeps) and minimal data use (no point receiving text messages or images)
Zello settings
You will find other settings on Your devices that are not listed here. This is Not a full settings list for every device,
just a few notes from my own working settings running Zello V4.2 (stable, low latency) on Inrico T199 (Android 4.4.2)
This configures Zello to minimise data use and only use Alert tones that are useful for normal operation.
These settings are my own preference and may not suit everyone but are certainly a good starting point.
=========================================================
Zello / Options / Appearance
Language English (auto is default)
Theme Black (black is default)
ON Lock screen orientation (on is default)
OFF Show audio level meter (on is default)
=========================================================
Zello / Options / Push-to-talk buttons
Screen Button: Set to Toggle (handy for operation when connected to PC)
VOX button: Set to Hidden (VOX causes more trouble than it is worth and is best left hidden to stop accidental use.)
Hardware button: Set to Hold to talk (Normal PTT button operation)
Note for bluetooth media button users: use the + (add button) function to select PTT on blutooth device. I use a 5 function media button, +vol and -vol adjust audio volume by default without any setup. I use the remaining 3 buttons for PTT toggle controls.
PLAY: set to Toggle
Previous: set to Toggle
Next: set to Toggle
=========================================================
Zello / Options / Behaviour
ON Start Zello when power on
Auto activate contact [ set to Never ]
ON Do not lock screen during conversation
OFF Set Zello status to Busy when in silent mode
OFF Set Zello status to Available when PTT button is pressed
OFF Save photos taken with system camera
OFF Use system camera to take photos
PUSH NOTIFICATIONS
ON Start Zello on incoming voice message
OFF Display call alerts
OFF Display channel alerts
OFF Display image notifications
OFF Display location notifications
OFF Display text notifications
WORKING IN BACKGROUND
ON Wake up device to keep Zello connected
=========================================================
Zello / Options / History
OFF Keep message history
=========================================================
Zello / Options / Alerts
Note: the alerts I have set to Custom below are using custom alert tones instead of the default Zello tones, Custom tones are available to download [ HERE ] if You wish to use them. If You do not want to use Custom tones simply set the Alerts shown below as Custom to Default and it will use the standard Zello tones.
Ready to send: Custom
Talk button up : Custom
Deliery Delayed : Default
Incoming message : None
End of incoming message : Custom
Missed message : None
Call Alert : None
Channel Alert : None
Image: None
Location: None
Text message: None
Channel text message: None
Default contact selected: None
New conversation: None
Connection lost: Custom
Connection restored: Custom
Error: Default
VIBRATE
OFF Ready to send
OFF Incoming message
OFF Missed message
VISUAL ALERTS (When in the background)
OFF Incoming voice message
OFF Incoming image
OFF Incoming call alert
OFF Incoming channel alert
OFF Incoming location
OFF conversation
OFF Incoming text message
OFF Incoming channel text message
=========================================================
Zello / Options / Audio
Playback Amplifier [Received AF gain]
OFF Automatic
Recording amplifier [Mic Gain]
OFF Noise suppression [Do not use with noise cancelling audio devices]
OFF Apply audio mode only when a message is sent or played (Set to ON to conserve bluetooth headset battery)
OFF Record high quality bluetooth audio (Set to ON if You intend to use bluetooth audio devices)
OFF Voice recording compatibility mode. (Only turn this on if outgoing messages sound too slow or too fast.)
Legacy bluetooth mode: Set to AUTO
=========================================================
Zello / Options / Restrictions
OFF Show trending channel list:
OFF Show incoming contact requests
OFF Allow adding channels
OFF Allow adding contacts
OFF Allow creating new accounts
OFF Allow sending and receiving images
OFF Allow sending and receiving texts
OFF Show profile images
=========================================================
Zello / Options / Support / Advanced settings
CALL SETUP
ON Enable asynchronous message delivery
ON Enable call pre-setup
NETWORKING MOBILE
Keep alive interval [ default 140sec : lower values can improve connection stability. I use 80sec ]
OFF Use TCP only
NETWORKING (WIFI)
Keep alive interval [default 140sec : lower values can improve connection stability. I use 110sec]
OFF Use TCP only
Setup and use of bluetooth media button.
Using a network radio or other mobile communications or media device while driving can be dangerous and it is illegal to use most devices while in control of a vehicle on the road unless You are using a 'hands free' system to control the device. Many modern vehicles have built in bluetooth systems with buttons on the steering wheel. Some vehicle bluetooth systems work well with mobile devices and network radios, others don't.
There are many bluetooth media buttons, earpiece devices and headsets that can be used safely and legally for 'hands free' operation of mobile devices.
As long as Zello can 'see' a button on the bluetooth device it can be used as a PTT button.
I have mounted a cheap bluetooth 4 media button on my mountain bike that lets me operate any of my network radios safely while on the move.
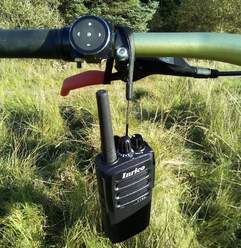
(Image copyright P.Scott)
|
With the T199 radio clipped onto my backpack shoulder strap I operate the PTT using a bluetooth media button mounted on the bike handlebar.
This lets me operate the PTT (set to toggle in Zello) and volume controls easily with my thumb while still being in full control of the bike. The media button does go into 'sleep mode' after a few minutes but a quick tap on any button wakes it up almost instantly. With the button now 'awake' another short tap operates the PTT toggle on the radio. After turning on bluetooth and 'pairing' the media button to Your radio is easy to set up the PTT toggle button In the Zello PTT app.
In the Zello app, go into the Zello menu (3 dots at top right) then select Options, Push-to-talk-buttons. Use the + (add button function) then press the media button You want to program. You can then select the new PTT button in the list and set Toggle mode. I have set the 'Play 'Previous' and 'Next' buttons as PTT toggle buttons for Zello. The volume + and - buttons operate the 'main Android volume' on the radio without any setup. |
Zello on T199 : Normal Operation
After You have set up Your T199 with the channels and contacts You wish to use programmed to suit Your preference You can disconnect the USB cable and switch off the T199 using the rotary volume/on/off switch on top of the radio.
When You turn the T199 on it will take a few seconds for the Android OS to boot up. During the startup process the T199 will make a noise to let You know it is booting, it will then say 'searching networks' after a few seconds it will emit a tone to let You know it has an active network connection, this can be either a WiFi network connection or 3G mobile data connection. It will then take a little time for the Zello application to start up, connect to the Zello servers and sign in.
When Zello starts up it will not be on one specific channel and You will hear transmissions from any of the channels or contacts You have programmed into the Zello account You are using on the T199. This is normal Zello operation and is Not a fault.
If You do Not touch the hardware channel selector Zello will behave as if it is in the 'channels' tab and You will hear transmissions from all channels. This will continue until You change channel using the hardware channel selector, Zello with then behave properly in SOLO mode.
After starting up my T199 I always wait for 1 or 2 minutes then turn the channel selector to 16, which I have programmed to the ECHO test contact, I then 'key up' and make a short test transmission, the ECHO contact then replays my transmission back confirming that I have a fully working connection and Zello is signed in and ready for operation. I can then change to the channel I wish to operate on knowing the system is 'good to go'.
T199 ROM notes
The factory installed ROM image in Inrico T199 Network Radios does Not contain the FOTAprovider or FWUpdateProvider (Adups malware/spyware) that is found hidden in many other Android devices.
The Original ROM image installed in the Inrico T199 Does Not need to be changed, updated or replaced.
The Original ROM image installed in the Inrico T199 Does Not need to be changed, updated or replaced.
Inrico T199 network radios are available pre-programmed.
The Inrico T199 16 channel hand held network radio is now available 'pre-programmed' from Moonraker UK LTD.
They can provide the T199 with the Network Radios suite of channels set up and ready to go!
Of course they can also program in other channels You wish to use on Your T199 network radio.
note: other suppliers may also provide a programming service.
They can provide the T199 with the Network Radios suite of channels set up and ready to go!
Of course they can also program in other channels You wish to use on Your T199 network radio.
note: other suppliers may also provide a programming service.
