Handy hints & tips for setup and use of Zello PTT app on Network Radios.
The "Zello PTT walkie talkie" app is one of the most popular free 2-way simplex communications applications used on Network Radios and mobile telephones. Most Network Radio hardware is produced with various versions of the Android operating system but the Zello PTT app is also available for Apple iOS devices and Windows PC systems.
Vision Impaired users Click/Tap here to read the Help Guide for iOS with Voiceover screen reader
The information and descriptions presented on this page were compiled using Versions 4.03, 4.05 and 4.20 of Zello with screenshot images captured from an Inrico T320 handheld network radio running Android 7.0 OS and Inrico TM-7 network radio running Android 6.0. Other versions of Zello will look slightly different and may not have all of the features shown on this page.
Newer versions of the Android Zello app have a blue 'overlay' circle at the lower right of the screen with a ' + ' symbol on it. This is used for adding channels, contacts and PTT buttons (depending on which screen/tab You are in)
I personally prefer to use Zello v4.20 in all my Android devices as it reacts to user input faster, does not 'drop out' as much as other versions and works more reliably when connected to WiFi mesh networks.
You may prefer using a newer version but I personally prefer V4.20 for speed, efficiency, stability and features unavailable in some other versions.
Zello Account tips.
Creating a Zello account User ID / user Name...
When You create a new account on Zello take a minute to think about Your user ID/account name. The account name You choose is 'locked in' and can not be changed later.
It makes sense to use a short account name like Your official licensed amateur radio callsign + name.
Unlicensed radio enthusiasts can create a new Zello account using Your Name + Location or Your registered NR callsign.
NR callsigns.
If You have a registered November Romeo 'Network Radios' callsign You can create a Zello account with Your registered 'NR number'
NR callsigns are entirely Optional. Unlicensed radio enthusiasts can use their registered NR callsign on the Network Radios channels.
Licensed Radio Amateurs can use their official licensed amateur radio callsign on the channels and use their registered NRnumber as a 'club member number'
Anyone who wishes to register for a NRcallsign / NRnumber should contact a moderator on one of the Network Radios channels.
NOTE: Do Not set up an account with an NR number that has not been registered with a channel moderator!
Any account attempting to use an unregistered NR number will NOT be 'trusted in' and may be blocked from the channels.
You need to register an NR number Before attempting to use it on the channels.
To register an NRcallsign You need to call a moderator on one of the channels, - or - contact a moderator on the Network Radios facebook group. The moderator can check availability of specific NR callsign numbers and arrange registration of an available NR callsign for You.
Using Multiple Accounts.
If You have more than one device You may find it handy to create a Zello account for each individual device.
With One Zello account all the channels, contacts etc added to an individual account will be accessible on whatever device You log into that account from but You can only be logged in on one device at a time. if You are logged in on device #1 and You login on a second device with the same account, You will get automatically logged out of device #1.
If You wish to have Both devices logged into Zello at the same time You will have to create a second account for the second device then add the channels and contacts you wish to use on that specific account. You may notice some operators using a -1 or -a suffix on their callsign when they are operating from their second device on their secondary account.
Many licensed amateur radio operators use an account with their HAM radio callsign on one device and second account with their NR callsign on another device.
Audio : Adjusting Levels
Zello 'three dots menu' / Options / Audio.
In the Audio setup menu You will find two sliders, the 'Playback Amplifier' adjusts the received audio level. The 'Recording Amplifier' adjusts Your transmit audio level (Mic Gain). I always 'un-check' the 'Automatic' boxes and use the manual sliders to set the levels on each device.
When setting up Your microphone and bluetooth headset or external mic audio levels it is best to go to Your 'Contacts' list and select the contact called 'Echo'. This will record Your test transmission and play it back to You enabling You to make fine adjustments and get clean audio at a sensible level without disrupting channels or calling on channels for an 'audio test' or 'mic check'.
After each adjustment, go back out of the options and return to the 'Talk' screen (with the on screen PTT button) and make sure that when You transmit the 'LED bar graph' at the bottom of Your talk screen (below the on screen PTT button) does not go into the red at voice peaks.
Try to set the 'recording amplifier' so that the 'LED bar graph' does not go above 3/4 of 'full scale deflection' and is always below the red.
Just like any other radio equipment if You over drive the mic input the transmitted audio will suffer from 'clipping' become 'crackly' and hard to understand by other stations receiving Your transmissions. Holding the mic at a sensible distance from Your mouth is also important and with sensitive microphones do not hold the mic directly in front of Your mouth as this produces 'popping' and 'wind noise' as You speak.
Using the channels with audio levels that are very low or very high makes it much harder for other operators to hear You properly and it is bad practice to operate with poor audio especially on Zello as the system provides excellent quality audio when the levels are set correctly.
Note: The ECHO in Your contacts list is the only proper echo test facility on Zello. The Echo test facility is a 'contact' Not a 'channel'.
If You see channels listed named 'Echo' or 'Echo Test' they are NOT the proper official Zello Echo test facility and should Not be used.
Audio : Noise Suppression
Zello 'three dots menu' / Options / Audio.
The Noise Suppression function can be used to help reduce background noise when using Zello in noisy locations.
This feature should only be use when necessary. In quiet locations the suppression function can cause distortion on Your transmitted audio.
You must make sure Noise Suppression in the Zello app is turned OFF if You are using a wired or bluetooth headset, microphone or other audio device that has noise suppression, noise cancellation or speech processing features. These devices will work well with Zello as long as the Zello Noise Suppression function is turned OFF.
Using such devices with the Zello Noise Suppression turned on badly distorts Your audio making it very hard for other operators to understand Your transmissions.
This is often why stations using bluetooth headsets or noise cancelling microphones sound like they are using DMR with poor quality compressed audio. This is usually fixed by turning OFF noise suppression in Zello and letting their noise cancelling headset or mic do the job on its own.
The Noise Suppression function is also rather 'power hungry' it can slow down some devices and significantly reduce operating time due to increased battery use.
For best results only use the Zello Noise Suppression function when absolutely necessary in a noisy location.
Adding Channels
This is a short tutorial to show the process of finding and adding channels on Zello.
There are many channels available on the Zello PTT system with new channels being created every day covering a vast range of interests.
The example presented below shows the process of adding channels that are part of the "Network Radios" suite of channels that has been mentioned recently in various publications including Practical Wireless, RadCom and Radio User.
This specific group of channels mostly used by licensed Radio Amateurs but also welcomes unlicensed radio enthusiasts and people wishing to gain operating experience in preparation for taking their amateur radio exam. These channels are operated using a relaxed form of Amateur Radio protocols and radio etiquette, the channels are managed by a team of moderators who ensure the channels are operated to reasonable standards and any troublemakers are removed. The moderators and many knowledgeable operators also provide assistance to new users on the channels.
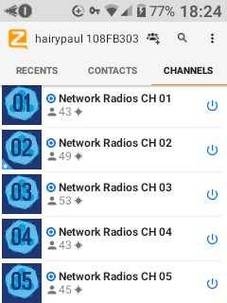
There are currently Eight channels available in the original 'network radios' suite of channels
To add these channels to Your Channels list. Use the 'Add channel' function in Zello,
Channel zero is called 'Network Radios' (channel logo shows 00) the other six standard channels are ' Network Radios CH 01 ' to ' Network Radios CH 06 ' (Channel logos show 01 to 06)
There is also a special Events channel called 'Network Radios EV' (channel logo shows EVENTS) this channel is used for a variety of events including radio rally days, hamfest events and scouting events. The EVents channel is also used on a Receive Only basis to allow licensed amateur radio enthusiasts and unlicenced users to listen to a selection of Worldwide nets hosted on the FreeSTAR network.
Operators wishing to use the Network Radios EV channel for an Event should contact a Moderator with event details & times.
When adding channels Please read the channel descriptions and make sure the channel owner is shown as G1YPQ
any channels that have a different channel owner are Not part of the original 'Network Radios' suite of channels.
: NOTICE : Do NOT accept 'channel invites' from any channel that says it is part of the Network Radios suite of channels or any channel that looks like it is using the same graphics and/or description. Other channels that 'pretend' to be part of this channel suite by using our copyright protected channel logos are doing so illegally. They are in direct violation of copyright / intellectual property laws and will be dealt with accordingly. These illegal channel owners are also violating the Zello Terms Of Service and may be banned from the Zello platform by Zello administration.
Important Notes:
Keyword channel search function has been removed from the Zello system.
To add a channel to Your channels list there are Three ways to do this:-
1: enter the Full channel name.
2: use a direct browser page link on the device You have Zello running on. eg; http://04.nrptt.uk will open the zello page for Channel 04 and add it to Your Zello channels list.
3: use a QR code (QR codes for each channel are listed on the NR CHANNELS page on this site.
Attempting to join a channel or get 'trusted' status on a channel by adding a moderator to Your contacts Will Not Work.
The "Contacts" list is for direct personal contacts only and has no connection with the "Channels" list or channel operation.
Any users with offensive user names, information or images on their Zello profile will be Blocked.
in accordance with the Zello Terms Of Service and Zello Community Guidelines.
Solo mode.
What is SOLO mode? : Solo mode has nothing to do with Your transmissions. It limits what You RECEIVE when You are in a channel.
With SOLO mode activated You will only hear transmission on the specific channel You are on and will not hear calls from other channels in Your channels list making it much easier to operate on that channel without interruptions from other channels.
I personally never use Available mode. To hear transmissions from all channels I go back out of the channel to the RECENTS list or CHANNELS list.
When I hear a transmission on any one of the channels that is switched on in my channels list and wish to reply to the station I heard, I select the channel they transmitted on. This takes me into that channel, I will then only hear transmission on that specific channel without interruption from other channels.
All transmissions on other channels are still recorded on my device into the channel history for each channel. This allows me to go back to each channel and listen through the history of each individual channel when convenient to do so.
Zello 'three dots menu' / Status / Solo
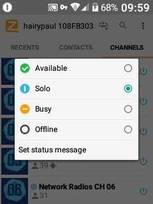
Solo mode on Inrico T320
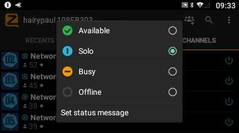
Solo mode on Inrico TM-7
|
When You first login to Your Zello PTT app Your status defaults to 'Available' mode.
When You have more than one channel in Your channel list and are in Available mode You will hear transmissions from all the channels that are switched on in Your list. This can be somewhat confusing when You are trying to have a QSO on a selected channel and You are receiving transmissions from the other channels in Your channel list between overs. You can set Solo mode by tapping the 'Three Dots Menu' at the top right of the screen, select STATUS and then select Solo. Now when You are in one selected channel You will only hear transmissions from other operators on that specific channel. When You go 'Back' out to Your CHANNELS list or RECENTS tab You will hear transmissions from all channels in Your channel list that are switched on. You can think of this as a sort of 'scanner mode' making it easy to find which channels have activity on them. |
Still hearing transmissions from another channel when in solo mode. ?
Default Channel Mode
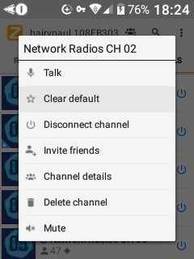
 Network Radios Ch 02 set as 'Default' channel. (small triangle at lower left of icon) Network Radios Ch 02 set as 'Default' channel. (small triangle at lower left of icon)
|
Some users found that while operating on one channel in Solo mode that they were automatically 'jumping to' another channel in their channels list.
After a bit of investigation we found they had accidentally set a 'default channel' This makes it behave like a form of 'priority' channel mode causing transmissions from the channel that is set to default mode to be heard when operating in Solo mode on a different channel by automatically changing to the default channel when a transmission is received on that channel. This can be useful in some circumstances but most of the time just makes things somewhat confusing. How to check for and clear a 'Default Channel'. Go to Your channels list and look at the channel icons. If a channel is set as 'Default' the channel will have a small triangle lit up in the lower left corner of its icon. (Image: The small triangle mark on Network Radios CH 02 shows it is set as 'Default Channel') |
|
To remove a Default channel setting.. Press and hold over the name of the channel that has the small triangle at lower left of its icon. This will display the command list as shown. Select the 'Clear default' function, this will remove the triangular channel marker and return the channel to normal operation. |
The DEFAULT channel setting does have its uses.
You can use this to give priority to a family channel or emergency channel that You do not want to miss any calls on.
Go to that channel and set that channel as Your DEFAULT.
This means that no matter what channel You are on when a transmission is received on Your default channel it will automatically change to that default channel.
Adding PTT buttons.
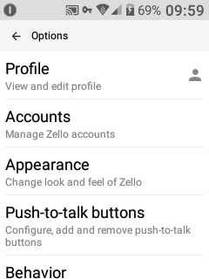
Zello 'three dots menu' / Options / Push-to-talk buttons
You can program multiple hardware buttons for use as PTT buttons in Zello.
This example shows the PTT button setup process using Zello PTT V4.05 on an Inrico T320 Network Radio.
Zello V4.09 and above also has the same functions but the +ADD BUTTON function is in a Blue Circle with + in it at lower right of the screen.
You need to go into the "Options" menu by selecting the 'three dots' at the top right of the Zello app screen.
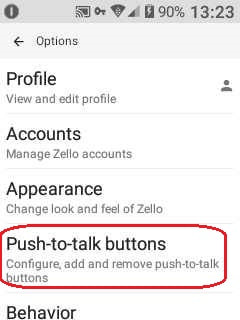
In Zello Options menu Select "Push-To-Talk buttons"
|
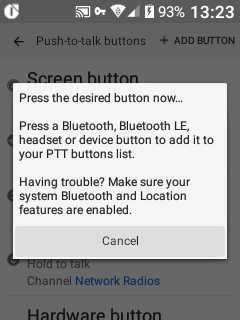
Select the +ADD BUTTON function.
You can then press the hardware button You wish to program.
|
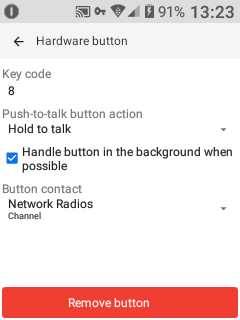
You can set the 'Push-To-Talk button action' to operate as a normal 'Hold to Talk' or 'Toggle' as required.
|
Use the 'Button contact' function to select the Contact or Channel You wish to transmit to with this button.
|
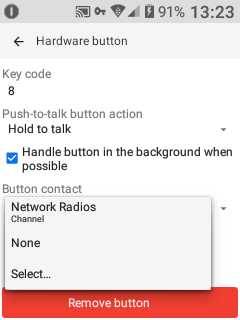
With the new Hardware button page open, Use the Select... function on the "Button contact" drop-down menu to add a contact or channel from Your Contacts list or Channels list.
* If You select a Contact the new button will Transmit directly to that Contact, not via a channel.
* If You select a Channel from You channel list the new button will Transmit on that Channel and all operators with that channel 'switched on' in their channel lists will receive Your transmission.
* If You select a Contact the new button will Transmit directly to that Contact, not via a channel.
* If You select a Channel from You channel list the new button will Transmit on that Channel and all operators with that channel 'switched on' in their channel lists will receive Your transmission.
Use the 'Back' button on Your device to exit all the menus and You can now use the new programmed hardware button as a dedicated PTT button for the Channel or Contact You selected with 'hold to talk' or 'toggle' button operation as required.
Bluetooth PTT Buttons
Make sure Bluetooth is switched ON in Your Android settings and the Bluetooth device You wish to use is 'Paired' to Your Network Radio.
Follow the same process as for a hardware PTT button until You select the "+ ADD BUTTON" function.
When prompted to Press the button You wish to use, Press the PTT button on the Bluetooth device.
If the button appears as a new button in the list then continue to set it up as shown above.
If You press the Bluetooth button and it does Not appear in the list this means the Bluetooth device may not be supported as a PTT button device by Zello and cannot be added and programmed as a PTT for Zello.
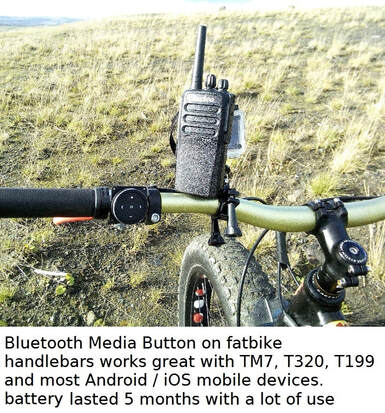
There are a vast selection of Bluetooth media buttons, selfie buttons, camera shutter buttons and PTT buttons commercially available with a variety of different Bluetooth implementations. Some will work with Zello and some will not.
It is best to confirm with the seller (or with another Zello user who has used the specific device) that it does work with Zello as a PTT button device before purchase. The Bluetooth media buttons I use are all Bluetooth 4 devices and these work well with Inrico T199, T320, TM7 and Senhaix N60 network radios and other Android and iOS devices that have Bluetooth enabled.
Follow the same process as for a hardware PTT button until You select the "+ ADD BUTTON" function.
When prompted to Press the button You wish to use, Press the PTT button on the Bluetooth device.
If the button appears as a new button in the list then continue to set it up as shown above.
If You press the Bluetooth button and it does Not appear in the list this means the Bluetooth device may not be supported as a PTT button device by Zello and cannot be added and programmed as a PTT for Zello.
There are a vast selection of Bluetooth media buttons, selfie buttons, camera shutter buttons and PTT buttons commercially available with a variety of different Bluetooth implementations. Some will work with Zello and some will not.
It is best to confirm with the seller (or with another Zello user who has used the specific device) that it does work with Zello as a PTT button device before purchase. The Bluetooth media buttons I use are all Bluetooth 4 devices and these work well with Inrico T199, T320, TM7 and Senhaix N60 network radios and other Android and iOS devices that have Bluetooth enabled.
Programming Hardware buttons to select Zello Channels
This handy tip was discovered by Filip NR001
NOTE: This works with the Paid version of Button Mapper only, The Free version of Button Mapper does not allow the 'broadcast intent' feature.
On the TM-7(plus) and TM-8 you can map the P1/2/3/4 buttons to go to a channel in Zello (and possible also contacts).
-Rename the channels you want to add to 01, 02 and so on to 08
-Add the buttons in Button Mapper and for every button add a "broadcast intent" to single tap (for CH 5 to 8 use long press)
-In the field "action" add " com.dfl.knob " without the brackets
-in the field "key:value" add " frequencyNum:XX " where XX is the number of the channel (01, 02...)
-save and try :-)
This method of programming hardware buttons to select Zello channels also works on many Android devices
I use this method of control to change channels on Zello using the rotary control knob on Inrico T320 and Inrico TM7 network radios.
I use this method of control to change channels on Zello using the rotary control knob on Inrico T320 and Inrico TM7 network radios.
Improving screen visibility in daylight.
Zello 'three dots menu' / Options / Appearance / Theme
T320 with theme set to 'White'
|
The Default Zello theme is 'Black' as seen on the TM-7 screenshots on this page, which can be hard to see in bright daylight when operating outdoors. Turning the screen brightness up does help a little but this uses more power, depleting the battery faster reducing operating time.
Changing the Screen background from black to white is a far better, more efficient option... Go into the Zello Options menu, accessed via the 'Three Dots' at top right of the Zello screen. In the Options menu, select 'Appearance' and change the 'Theme' to White, This improves readability in daylight without needing to crank up the screen brightness, You may also wish to turn down the screen brightness which reduces current consumption and extends the battery operating time. |
Receive Volume Adjustment for Individual Stations.
As Zello is used on a wide range of devices with different microphones and headsets, You will find that some stations are louder or quieter than most others. Instead of constantly adjusting Your main volume control during operation You can adjust the receiver gain for each individual station to bring their audio level in line with everyone else.
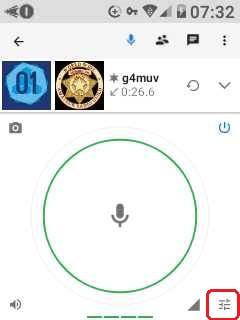
While receiving a transmission from a station who's audio is louder or quieter than others, You can adjust the level for the specific station by selecting the 'settings' button at lower right of screen.
|
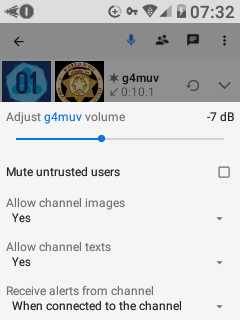
The slider lets You adjust the audio volume for the selected station. This setting is stored on Your device and used every time the specific station is received.
|
Note: You can also adjust Your receiver volume level for individual stations using the volume slider on their Zello user profile.
You can access each users profile page by selecting the profile image beside their user name on channel user listings.
There is also quick shortcut to adjust the receive volume for individual stations.
While receiving the station You wish to adjust audio level on, Hold your finger on the screen on a blank area beside the on screen PTT button, drag your finger into the PTT button area and rotate clockwise / anticlockwise to adjust the volume for the station You are hearing.
The adjustment You make for each individual station is stored on Your device and will be used each time You receive that station.
Zello 'Alerts'
NOTE: Using custom tones is one of the features that has been removed from some versions of the Zello Android app. (This is just one of the reasons why I personally use Zello v4.20 on all my devices)
The default settings on the Zello PTT app can become annoying with various tones, beeps and vibration 'buzzy noises' going off all the time.
Audio alerts and the vibrate 'buzz' alerts can all be turned on/off in the Alerts menu in Zello Options.
Alert tones can often be heard when stations are transmitting, these alerts are often very loud 'on air' and many alerts are best turned off.
Note: the alerts I have set to Custom below are using custom alert tones instead of the default Zello tones,
Custom tones are available to download on the MISC page if You wish to use them. (or You can create Your own custom tones)
If You do not want to use Custom tones simply set the Alerts shown below as Custom to Default and it will use the standard Zello tones.
Zello 'three dots menu' / Options / Alerts
Ready to send: Custom
Talk button up : Custom
Delivery Delayed : Default
Incoming message : None
End of incoming message : Custom
Missed message : None
Call Alert : None
Channel Alert : None
Image: None
Location: None
Text message: None
Channel text message: None
Default contact selected: None
New conversation: None
Connection lost: Custom
Connection restored: Custom
Error: Default
VIBRATE
Ready to send: OFF
Incoming message: OFF
Missed message: OFF
VISUAL ALERTS (When in the background)
Incoming voice message: OFF
Incoming image: OFF
Incoming call alert: OFF
Incoming channel alert: OFF
Incoming location: OFF
conversation: OFF
Incoming text message: OFF
Incoming channel text message: OFF
Adding Contacts.
It is easy to send other operators You have spoken to on the channels a 'contact request' so You can add them to Your private Contacts. You will have to wait for the other user to respond to the request. If the other user Accepts Your request they will appear in Your Contacts list and You will appear in their Contacts list.
By selecting a user in Your Contacts list You can communicate with them 'direct' for a private One-to-One QSO without using a channel.
It is good practice to actually make contact with someone on the channels and ask before sending a contact request as many operators do not accept unsolicited contact requests and will treat them as junk mail or spam with either the Decline or Block functions.
It is also worth noting that some operators will have the 'receive contact requests' function turned Off and will not receive any contact requests sent to them or get any notification that someone has sent a contact request so it is always best to ask first.
NOTE: Attempting to join a channel or get 'trusted' status on a channel by sending a contact request to a moderator Will Not Work.
To be trusted on a channel You need to have the channel turned ON so Your User ID is visible in the 'untrusted users list'.
A moderator can then see Your Zello profile information. They may decide to give You trusted status without speaking to You if Your profile provides sensible information. If You have not been trusted in after waiting a while simply call in giving Your name and ask if a moderator can please trust You in on the channel.
NOTE: Users with offensive user names, information or images that are not 'family friendly' on their profile will be Blocked.
Options / Restrictions
Zello 'three dots menu' / Options / Restrictions
These are the setting I use on my Network Radio devices that have screen displays (TM-7, T320 and SenhaiX N60)
You will need to set these according to Your own requirements.
Show trending channel list: OFF
Show incoming contact requests: OFF
Allow adding channels: OFF
Allow adding contacts: ON
Allow creating new accounts: OFF
Allow sending and receiving images: ON
Allow sending and receiving texts: ON
Show profile images: ON
Reducing 'drop outs' during mobile operation
and when using multiple access points, WiFi extenders or mesh networks
Zello 'three dots menu' / Options / Support / Advanced Settings / Keep Alive Interval
The "Keep Alive Interval" is a delay timer that sets the number of seconds between 'connection checks'.
This changes the frequency that the Zello app sends 'Keep Alive' data packets to the Zello servers keeping the connection active.
Reducing the Keep Alive Interval increases the frequency of sending 'Keep Alive' packets.
This effectively holds onto the data connection more often which can help make your connection more reliable when operating mobile, this can be especially useful when travelling at speed in a vehicle.
Increasing the Keep Alive Interval reduces the frequency of 'keep alive' packet transmissions and can very slightly improve battery life, but this can have an adverse effect on connection stability during mobile operation.
There is also an option to adjust the Keep Alive Interval for WiFi connections. Reducing the interval time can help to reduce drop outs experienced wth some WiFi networking equipment. This is useful when using mesh networks, multiple access points or WiFi extender devices.
It is also worth checking that Your WiFi router, access point or extenders are locked to one WiFi channel as many users experience frequent drop outs during the times their router, AP or extender is scanning the ISM band to check which channels are busy. Some mobile devices also drop out briefly when changing channels to follow the router, AP or extender connection.
Proper readability reporting on Network Radios
As Network Radios deal with RF signal level adjustments automatically and they do not have a signal meter display attempting to give a 'S'ignal report is totally meaningless.
The 'R'eadability of the received audio can be reported properly using the following scale..
1 = Unreadable. Not able to make out any speech due to no audio, extremely low audio input, extreme high level distortion or 'drop outs'
2 = Barely readable, occasional words distinguishable. (usually due to background noise or excessively high or low audio input causing distortion)
3 = Readable with considerable difficulty. (usually due to background noise or excessively high or very low audio input causing distortion)
4 = Readable with practically no difficulty. (maybe a bit of background noise but operators voice still relatively clear above the noise level)
5 = Perfectly readable.
EG; Perfectly clean audio received at a good level with no background noise would be reported as 'Q5' or 'Readability 5'.
Users who give a '59' or say 'Your are five and nine' are most likely just doing so by habbit and the '5' Signal report has no meaning.
When using Zello PTT on Network Radios You should always use the Echo test service in Your Contacts list to check Your audio and make any adjustments required to get Your audio to a 'Q5' - Clean, clear speech at a sensible level, before transmitting on the channels.
Zello Support
For more information on features and functions of the latest Zello PTT application on all platforms visit the Support section of the Zello website.
IMPORTANT NOTICE
All Zello users MUST adhere to the published Zello Terms Of Service. https://zello.com/terms/
and Zello Community Guidelines https://zello.com/zello-community-guidelines.htm
Users who violate the Zello Terms Of Service will be blocked from the channels.
Users who ignore the Zello Community Guidelines will be dealt with accordingly.
and Zello Community Guidelines https://zello.com/zello-community-guidelines.htm
Users who violate the Zello Terms Of Service will be blocked from the channels.
Users who ignore the Zello Community Guidelines will be dealt with accordingly.
