|
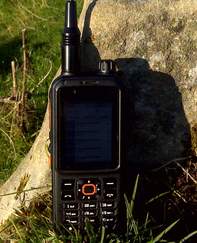
Inrico T320GSM/2G/3G/4G/WiFi
Network Radio Transceiver |
How to get 'Talkback' screen reader working on the T320
For blind or partially sighted operators You may find it easiest to get a sighted friend to help You install and set up the Accessibility Suite which provides several useful features including the screen reader with control gestures that works well with Zello and many other Apps.
#1 Install the Android Accessibility Suite from the Google Playstore. [link to accessibility suite in playstore]
#2 Go to the Android Settings app in Your device and scroll down to the Accessibility menu.
#3 Turn on "Talkback" (at top of accessibility list)
#4 Turn on "Select-To-Speak" (second from top in accessibility list) and follow the live tutorial to learn the controls.
#5 Farther down the accessibility list You can switch on the "Accessibility Shortcut" which makes it easy to toggle the Accessibility functions on and off without having to hunt through the menu lists.
Note: This also works on many other Android based Network Radios and Mobile Communications Devices.
Inrico T320 Specifications.
Model: Inrico T320
CPU: ARM Cortex A53 Quad Core
CPU Frequency: 1 GHz (clock range 221 - 1092 MHz)
Platform: Microtek MTK6737M (MT6737WM)
Operating System: Android 7.0 (Nougat)
Internal Memory: 1G+8G
Extended Memory: Up to 32 GB: Internally fitted SDcard (use high speed SDcard for best performance)
Screen TP display: IPS 2.45” 240*320 G+F multi-touch: Works well with 'Capacitive' touch screen stylus.
Battery: Li-Ion 3.8V 3500mAh/13.3Wh
Standby Time: 80 Hours
Talk Time: 8 Hours
Speaker: 8mm 1.2W
USB: Micro USB 5-pin socket (for data cable/OTG cable & +5V DC USB charging)
Camera: Front camera 2.0MP, Rear camera 8.0MP
SIM card: Standard SIM card & Micro SIM card
Navigation: GPS (internal GPS antenna)
Sensors: Accelerometer, Gyroscope, Rotation Vector Sensor, Gravity Sensor.
Dimensions: 130mm x 60mm x 27.6mm
Weight: 252g
RF Network Support:-
- EU Version: GSM B2/B3/B5/B8: WCDMA B1/B2/B5/B8: FDD-LTE B1/B3/B7/B20/B28: TDD-LTE B38/B39/B40/B41: ISM
- US Version: GSM B2/B3/B5/B8: WCDMA B1/B2/B5/B8: LTE B2/4/5/12/13/17: ISM
External antenna connection type: SMA-reverse Antenna
2G
Networks: GSM, GPRS, EDGE
Bands: GSM800, PCS1900
Uplink Frequencies:
GSM/GPRS/EDGE 850, 824 - 849 MHz
GSM/GPRS/EDGE 1900, 1850 - 1920 MHz
Downlink Frequencies:
GSM/GPRS/EDGE 850, 869 - 894 MHz
GSM/GPRS/EDGE 1900, 1930 - 1990 MHz
RF Output Power:
GSM850 33.03dBm ( 497 femtowatts )
GSM1900 29.57dBm ( 1104 femtowatts )
EDGE850 26.69dBm ( 2142 femtowatts )
EDGE1900 25.54dBm ( 2792 femtowatts )
Modulation Type: GMSK, BPSK
Antenna Gain: (standard antenna supplied with radio)
GSM850 0.4dBi,
GSM1900 1.5dBi
Class: GPRS/EDGE Class 12
3G
Networks: WCDMA, HSDPA, HSUPA
Bands: WCDMA Band 2, WCDMA Band 5
Uplink Frequencies:
WCDMA Band 2, 1850 - 1910 MHz
WCDMA Band 5, 824 - 849 MHz
Downlink Frequencies:
WCDMA Band 2, 1930 - 1990 MHz
WCDMA Band 5, 869 - 894 MHz
RF Output Power:
WCDMA Band 2 22.88dBm
WCDMA Band 5 23.14dBm
Modulation Type: BPSK
Antenna Gain: (standard antenna supplied with radio)
WCDMA Band 2 1.5dBi,
WCDMA Band 5 0.4dBi
4G
Networks: FDD-LTE
Bands: FDD-LTE Band 1, 2, 4, 5, 12, 13, 17, 20, 28
Uplink Frequencies:
Band 1, 1920 - 1980 MHz
Band 2, 1850 - 1910 MHz
Band 4, 1710 - 1755 MHz
Band 5, 824 - 849 MHz
Band 12, 699 - 716 MHz
Band 13, 777 - 787 MHz
Band 17, 704 - 716 MHz
Band 20, 832 - 862 MHz
Band 28, 703 - 748 MHz
Downlink Frequencies:
Band 1, 2110 - 2170 MHz
Band 2, 1930 - 1990 MHz
Band 4, 2110 - 2155 MHz
Band 5, 869 - 894 MHz
Band 12, 729 - 746 MHz
Band 13, 746 - 756 MHz
Band 17, 734 - 746 MHz
Band 20, 791 - 821 MHz
Band 28, 758 - 803 MHz
RF Output Power:
Band 2, 23.67 dBm
Band 4, 24.51 dBm
Band 5, 23.30 dBm
Band 12, 24.26 dBm
Band 13, 23.69 dBm
Band 17, 25.07 dBm
Band 20, 23.54 dBm
Band 28, 24.32 dBm
Modulation Type: QPSK, 16QAM
Antenna Gain: (standard antenna supplied with radio)
Band 2, 1.5 dBi
Band 4, 0.9 dBi
Band 5, 0.4 dBi
Band 12, 0.4 dBi
Band 13, 0.4 dBi
Band 17, 0.4 dBi
Band 20, 0.4 dBi
Band 28, 0.4 dBi
Antenna Notes: External antenna is the primary network TX/RX antenna, there is also an internal secondary 'diversity' antenna.
The T320 combines internal and external antennas to optimise connection stability and data streaming bandwidth when conditions allow it.
The internal antenna is also used to provide a form of low power diversity reception/transmission when the main external antenna RF module is in low power/standby mode. This feature helps to improve battery performance.
Cell-Network connection range can be easily extended by using a high gain external LTE antenna, directional beam or high gain antenna array.
WiFi (2.4GHz)
Network Standards: 802.11b, 802.11g, 802.11n
Frequency Ranges:
802.11b/g/n (HT20) 2412 - 2462 MHz
802.11n (HT40) 2422 - 2452 MHz
RF Output Power: 13.08 dBm (Conducted)
Modulation Types: CCK, OFDM, QPSK, BPSK, 16QAM, 64QAM
Data Rates:
802.11b 1 - 11 Mbps
802.11g 6 - 54 Mbps
802.11n up to 150 Mbps
Channels:
802.11b/g/n (HT20) = 11
802.11n (HT40) = 7
Channel Separation: 5 MHz
Antenna Gain: 1.1 dBi (internal antenna)
WiFi (5GHz band A)
Network Standards: 802.11a / 802.11n
Frequency Range: 5150 - 5350 MHz (channels 36 - 64)
RF Output Power: 200 mW (Max)
Modulation Types: OFDM, BPSK, QPSK, 16-QAM, 64 QAM
Data Rate: 6 - 54 Mbps
Channel Bandwidth: 20 MHz (16.6MHz data/pilot carriers + guard band)
Sub Carriers: 52 (48 data/4 pilot) + 8 'guard band'
Sub carrier separation: 0.3125 MHz
Bluetooth
- Version: V4.0 BDR/EDR mode (Basic Data Rate / Enhanced Data Rate )
Frequency Range: 2402-2480MHz
RF Output power: 3.093dBm (Conducted)
Data Rate: 1Mbps, 2Mbps, 3Mbps
Modulation: GFSK, Pi/4 QDPSK, 8DPSK
Quantity of Channels: 79
Channel Separation: 1MHz
Type of Antenna: Internal
BT Antenna Gain: 1.1dBi
- Version: V4.0 BLE mode (Bluetooth Low Energy)
Frequency Range: 2402-2480MHz
RF Output Power: 3.241dBm (Conducted)
Data Rate: 1Mbps
Modulation: GFSK
Quantity of Channels: 40
Channel Separation: 2MHz
Type of Antenna: Internal
BT Antenna Gain: 1.1dBi
Handy setup tips.
To turn off the annoying beeps and vibration for the on-screen keyboard:
Android Settings / Language & Input / Virtual Keyboard / Android Keyboard / Preferences /
Turn OFF 'Vibrate on keypress' and 'Sound on Keypress'
To turn off other beeps and vibration events:
Android Settings / Sound / Other Sounds /
Turn OFF 'Dial pad tones' , 'Screen locking sounds' , 'Touch sounds' and 'Vibrate on tap'
To increase speaker volume for use in noisy environments:
Android Settings / Sound / Sound enhancement /
Turn ON 'Best Loudness' (volume boost for speaker)
To change the size of on screen icons and text:
Android Settings / Display /
You can set the 'Font size' (changes size of text) and 'Display Size' (changes size of icons) to suit Your needs.
To extend time screen stays on before going to 'sleep'
Android Settings / Display / Sleep /
You can select from 15 seconds to 30 minutes.
Keeping the screen on for longer will use more power. Reducing screen sleep timer will use less power providing longer battery life.
Hardware Notes:
Some Network Radio device users (and Dual-SIM phone users) have experienced a 'rattling sound' when operating mobile devices in vehicles.
This is often due to mounting arrangements allowing the radio to move in a 'holder' or pick up vibration from the vehicle mounting system in use. If the mounting system is not the source of the rattle it may be within the device itself.
Many 'Dual SIM' devices experience intermittent internal 'rattling' or 'buzzing' sounds when only fitted with One SIM card. (or no sim if used on a WiFi hotspot)
This is often caused by the metal 'cage' on an empty internal SIM card holder (or empty micro-SD card holder) moving on its hinges/slide arrangement as it 'picks up' and reacts to vibrations from the vehicle.
This vibration issue can be addressed by either installing a second SIM in the empty SIM slot.
Fitting a spare SIM (or an old SIM) which can be turned OFF in the Android SIM settings stops the 'cage' producing unwanted noise.
If You do not have a spare or old SIM card handy You can also cure the issue by placing a small piece of card or folded paper in the empty SIM holder to stop it vibrating during mobile operation. (A simple piece of insulating tape or a small blob of 'Blu-Tac' also works well)
An empty SDcard slot cover can also be silenced in the same way.
Using hardware rotary control knob to change Zello channels on T320
To use the rotary volume control knob on top of the T320 to change channels in Zello,
You will need to install the Button Mapper app and make a donation to the developer to use the PRO features. (broadcast intent)
In Button Mapper (donation/paid version)
First You must ADD new buttons and program them to change the Volume up/down (the buttons on left side below PTT button are handy) Once You have programmed new volume control buttons You can set up the hardware rotary control knob to change channels.
Select ADD button and turn the rotary knob a click to the Left,
This will add the button and allow You to program three settings for the button.
You need to program all three settings, Single Tap, Double Tap and Long Press: with the same Action.
Select 'Action' and set 'Broadcast Intent' to com.zello.intent.channelDown ( Down must have a capital D ).
Now ADD button and turn the rotary knob a click to the Right,
Now program the button Action for all three settings (Single, Double and Long press) setting 'Broadcast Intent' to, com.zello.intent.channelUp ( Up must have a capital U )
Rename the channels you want to select so they start with numbers (You can use 00 or 01 as first channel number)
00 channel name,
01 channel name,
02 channel name,
etc..
If You also want to select friends in Your Contacts list, Rename the chosen contact so it starts with a suitable number.
Make sure You only have one channel or contact starting with each number.
You will now be able to select the channels (and contacts) You renamed in numerical order by turning the hardware rotary control knob.
* A big Thank You to NR001 Filip for the programming information.
Reducing 'drop outs' during mobile operation
and when using multiple access points, WiFi extenders or mesh networks
The Zello PTT app seems to suffer with drop outs more often than some other packet streaming VOIP/data apps and often takes a while to reconnect. when this happens Zello can spend several seconds 'signing in' even though other apps have not dropped out and still have a stable connection. I can only assume this is due to the buffering and latency handling methods used by each particular application. Zello PTT may not be the best for stability, but it is also not the worst. It is often more reliable than than many of the paid for platforms available, some of which are quite expensive. There are a few things that You can do to improve reliability and make the system more stable.
Zello 'three dots menu' / Options / Support / Advanced Settings / Keep Alive Interval
The "Keep Alive Interval" is a delay timer that sets the number of seconds between 'connection checks'.
This changes the frequency that the Zello app sends 'Keep Alive' data packets to the Zello servers keeping the connection active.
Reducing the Keep Alive Interval increases the frequency of sending 'Keep Alive' packets.
This effectively holds onto the data connection more often which can help make your connection more reliable when operating mobile, this can be especially useful when travelling at speed in a vehicle.
Increasing the Keep Alive Interval reduces the frequency of 'keep alive' packet transmissions and can very slightly improve battery life, but this can have an adverse effect on connection stability during mobile operation.
There is also an option to adjust the Keep Alive Interval for WiFi connections. Reducing the interval time can help to reduce drop outs experienced wth some WiFi networking equipment. This is useful when using mesh networks, multiple access points or WiFi extender devices.
It is also worth checking that Your WiFi router, access point or extenders are locked to one WiFi channel as many users experience frequent drop outs during the times their router, AP or extender is scanning the ISM band to check which channels are busy. Some mobile devices also drop out briefly when changing channels to follow the router, AP or extender connection.
Other Handy Android APPs
As the T320 runs Android 7 operating system there are many applications that can be installed and used on this device.
NOTE: The applications shown on this page also work well on many other network radios, tablets and phones.
NOTE: The applications shown on this page also work well on many other network radios, tablets and phones.
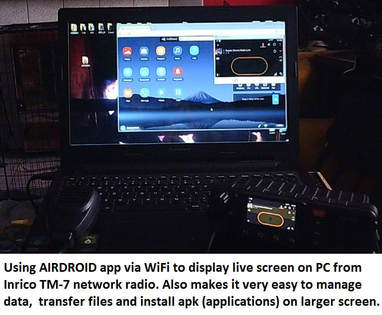
Airdroid
AIRDROID This is a free APP available in the Google Play Store that will let You see the live screen display from Your network radio on Your PC, manage all the files and images on Your radio, use the camera remotely and install APK files from Your PC into the radio.
With Your network radio connected to Your local area network (LAN) via WiFi and Your PC connected to Your LAN either via WiFi or an Ethernet cable.
Download and install AirDroid on the T320. Run AirDroid on the T320, after a few seconds You will be presented with available connection options. Select "AirDroid Web" this will display an IP Address on the T320 screen.
Open a web browser on any PC connected to Your local network and type the IP address into Your browser on the PC.
This will pop open a request window on the T320 screen, Once You Allow the connection the device manager display will appear in Your browser window on the PC.
You can now manage the files and applications on Your network radio from the browser window on Your PC.
To see the live screen display from Your radio on the PC . . .
Click on the ' Screenshot ' icon (looks like a pair of scissors)
A window will pop up on the T320 screen, select "Start Now"
You will now have a live video display of the screen from Your T320 network radio in Your browser window on the PC.
You can expand the live display from the T320 to full screen on the PC. When operating full screen there is a vertical slider on the right hand side that allows You to adjust the update speed and bandwidth used for video streaming to suit Your requirements and LAN speed.
(Image copyright P.Scott)
|
(Image copyright P.Scott)
|
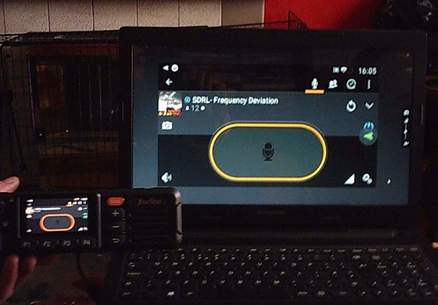
Full 'Remote Control' of T320 from PC
You can use an Android remote control program to your computer such as Total Control. - click HERE to go to sigma-rt website - The Total Control program runs on Your PC allowing You to use a window on Your PC screen to see and control the Android device using the keyboard and mouse on Your PC. This is especially useful for operators who have trouble using the on screen keyboard when setting up the device or using applications that are hard to see on the small screen.
Note: You will need to use a 5 pin micro USB to Type-A USB (standard PC USB socket) cable to connect the radio to Your PC.
After plugging in the USB cable, drag down the notifications from the top of the T320 screen and change the USB connection type to 'File Transfer' mode. You can now run the Total Control software on the PC and follow the instructions and prompts provided.
Important APPs for safety/security and WiFi stability
There are two APPs that I consider to be essential on Android devices (Network Radios, Mobile Phones, Smart Watches etc)
#1: NetGuard - no-root Firewall : by MARCEL BOKHORST
This is essential to improve device security. Providing You with the option to block/allow access to the internet through WiFi and mobile connections for user installed & 'baked in' (factory installed) applications. More importantly the firewall can be used to stop hidden applications (and spyware) from sending data out to external IP addresses.
Setup: After installing NetGuard and giving it all requested permissions go to the 'Advanced Options' and turn on the 'Manage System Apps' feature then You can select which individual applications and system tasks are allowed to access the internet via WiFi and mobile network connections.
How to check for and Block the FotaProvider 'spyware / backdoor installer' on Android devices using Netguard.
Go into the netguard settings (via three vertical dots at top right of netguard screen) select 'Settings' then 'Advanced Options' and Enable 'Manage system apps' by sliding the switch at the right hand side to turn it on. Return to the netguard app list using your device 'back' button.
Scroll down the list on the netguard app list checking for 'FotaProvider' If You have this app in Your device tap on both the Wifi and Mobile Data icons on the right hand side to Block the FotaProvider spyware from being able to use Your Wifi and Mobile data connections. This effectively stops the 'FotaProvider' spyware being able to send 'collected data' from Your device to unknown organisations over the data connection and Blocks it from downloading data from external sources without notification.
** NetGuard is a powerful Firewall Application, Please read up on how to use NetGuard and be careful which other system tasks/Apps You allow/deny network access to. Depending on what Apps You use some hidden 'background tasks' are required for correct operation of Your device and many others are Not required.
It is important that You research any applications/system tasks You see listed in Your device that You do not know about before deciding to block/deny their internet access. The specific apps found in Your device will depend on the OS version, what software has been 'baked in' on the factory flashed ROMs and which user applications You have installed.
#2: Best WiFi Keeper : by MARIOBILE
* I consider this as an essential App If You use WiFi connections. If You only use mobile network connections You do not need this App. *
This application keeps Your WiFi connection alive, stopping the random WiFi device reset/drop problems experienced by many users of mobile phones and network radios with Android OS. If You have had random WiFi drop-outs on Your Android device even though You are well within Your WiFi coverage area and the actual WiFi signal strength has not reduced, Best WiFi Keeper will fix the problem on most devices.

Image above shows what the App icons look like so You can find the right ones easily in the Play-Store
NetGuard settings for T320 WiFi Hotspot & mesh networking.
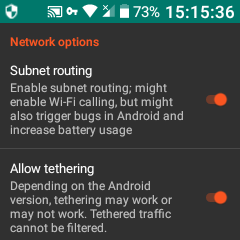
Open NetGuard and go into NetGuard menu, select settings/ network options/
then Turn ON the 'Subnet routing' and 'Allow tethering' functions. (as shown in screen image)
This works well on the Inrico T320 with multiple devices connected to the hotspot.
Whether or not a specific HotSpot setup works depends on the specific Android version in Your device as some Android versions have a bug that stops the tethering service and the VPN service working together.
Some devices force the WiFi device to 'hibernate' when the screen is off, preventing tethering from working. This behavior can be disabled in the Android enhanced/advanced Wi-Fi settings on most devices.
Using a Motorola speaker mic on the T320
The audio output level of the internal speaker on the T320 is very high but if You use a Motorola speaker mic on the T320 (or other speaker mic with Motorola M5 type connector) the receiver audio output level through the external mic is rather low.
You can adjust the speaker mic output volume levels on the Inrico T320 by adjusting each volume step in Engineers Mode.
:When making adjustments in Engineers Mode Do Not Not rush the process, take Your time and get it right.
:NOTE: Do Not 'play with' any other settings in Engineers Mode unless You know exactly what You are doing.
There are many critical functions that can be changed in Engineers Mode, some of which can stop Your device from operating if set incorrectly. Be Careful, do not rush. Only adjust the settings for Audio / Headset Mode. Leave all other settings as found.
#1: Attach Your speaker mic (or headset) as normal.
#2: Open your 'telephone number dialing application' and type in the following using the physical keypad:-
*#*#3646633#*#*
This will put Your T320 into Engineers Mode.
#3: swipe Your screen to the left until you see AUDIO listed and tap on AUDIO.
#4: select HEADSET MODE.
You can now select each volume step with the 'Level' selector (Level0 to Level6) and increase output value as required for each of the seven available levels.
You must hit 'SET' to store the new entry every time You change a 'value'
Once You have finished setting Your level values Exit engineers mode by returning to Your home screen (either tap back button several times or use Home button if You have one set up)
The levels/values You use will depend on the characteristics of the specific speaker mic You are using.
Go to Your Zello Contacts list and test the speaker mic using the 'Echo' contact.
You may have to adjust the values in Engineers Mode a few times to get the output levels for each 'volume step' exactly as You need them to suit Your operating conditions and local environment.
Background noise will be higher in a vehicle and will require higher output levels than operating in a quieter location.
:- You may also wish to adjust Audio Levels for other operating modes. The various modes in the AUDIO section are.
Normal Mode: Active when there are no external audio devices attached.
Headset Mode: Active with external headset or speaker mic plugged in.
LoudSpeaker Mode: Active when there are no attached headsets and user turns on Speakerphone mode during a telephone conversation.
Headset LoudSpeaker Mode: Active if user turns on LoudSpeaker when headset or speaker mic is connected.
Speech Enhancement: Active during normal telephone call with No headset or speaker mic and Speakerphone Mode turned OFF.
:- The following procedure will increase the received Audio volume level for Telephone calls on the T320.
enter this string into the 'Telephone dialer application' to access Engineer Mode
*#*#3646633#*#*
Swipe the screen to the left until You see AUDIO, select AUDIO then 'Speech Enhancement'
Set the first field to 'Normal Mode' and the second field to 'Parameter 7'
change the 'Value' to between 96 and 128 then hit 'SET'
Then 'back out' of the Engineer Mode to Your home screen.
(or hit Home button if you have one set up)
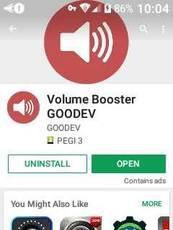
If You are not 100% happy with making adjustments in Engineers Mode the audio output level through the speaker mic can also be increased by using an audio amplifier application. The 'Volume Booster' app shown below is a free download from the Playstore that is easy to set up and control providing significant amplification greatly improving the audio output level on an external speaker mic.
You can adjust the speaker mic output volume levels on the Inrico T320 by adjusting each volume step in Engineers Mode.
:When making adjustments in Engineers Mode Do Not Not rush the process, take Your time and get it right.
:NOTE: Do Not 'play with' any other settings in Engineers Mode unless You know exactly what You are doing.
There are many critical functions that can be changed in Engineers Mode, some of which can stop Your device from operating if set incorrectly. Be Careful, do not rush. Only adjust the settings for Audio / Headset Mode. Leave all other settings as found.
#1: Attach Your speaker mic (or headset) as normal.
#2: Open your 'telephone number dialing application' and type in the following using the physical keypad:-
*#*#3646633#*#*
This will put Your T320 into Engineers Mode.
#3: swipe Your screen to the left until you see AUDIO listed and tap on AUDIO.
#4: select HEADSET MODE.
You can now select each volume step with the 'Level' selector (Level0 to Level6) and increase output value as required for each of the seven available levels.
You must hit 'SET' to store the new entry every time You change a 'value'
Once You have finished setting Your level values Exit engineers mode by returning to Your home screen (either tap back button several times or use Home button if You have one set up)
The levels/values You use will depend on the characteristics of the specific speaker mic You are using.
Go to Your Zello Contacts list and test the speaker mic using the 'Echo' contact.
You may have to adjust the values in Engineers Mode a few times to get the output levels for each 'volume step' exactly as You need them to suit Your operating conditions and local environment.
Background noise will be higher in a vehicle and will require higher output levels than operating in a quieter location.
:- You may also wish to adjust Audio Levels for other operating modes. The various modes in the AUDIO section are.
Normal Mode: Active when there are no external audio devices attached.
Headset Mode: Active with external headset or speaker mic plugged in.
LoudSpeaker Mode: Active when there are no attached headsets and user turns on Speakerphone mode during a telephone conversation.
Headset LoudSpeaker Mode: Active if user turns on LoudSpeaker when headset or speaker mic is connected.
Speech Enhancement: Active during normal telephone call with No headset or speaker mic and Speakerphone Mode turned OFF.
:- The following procedure will increase the received Audio volume level for Telephone calls on the T320.
enter this string into the 'Telephone dialer application' to access Engineer Mode
*#*#3646633#*#*
Swipe the screen to the left until You see AUDIO, select AUDIO then 'Speech Enhancement'
Set the first field to 'Normal Mode' and the second field to 'Parameter 7'
change the 'Value' to between 96 and 128 then hit 'SET'
Then 'back out' of the Engineer Mode to Your home screen.
(or hit Home button if you have one set up)
If You are not 100% happy with making adjustments in Engineers Mode the audio output level through the speaker mic can also be increased by using an audio amplifier application. The 'Volume Booster' app shown below is a free download from the Playstore that is easy to set up and control providing significant amplification greatly improving the audio output level on an external speaker mic.
APP: Volume Booster
|
|
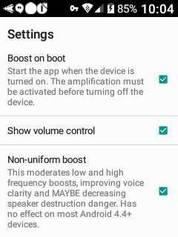
WARNING
This volume booster can amplify the audio level of the built in speaker to an extremely high level.
Make sure You turn the Volume Booster app off Before disconnecting the external speaker mic.
This volume booster can amplify the audio level of the built in speaker to an extremely high level.
Make sure You turn the Volume Booster app off Before disconnecting the external speaker mic.
Bluetooth speaker-mic for T320
You can also use the Inrico B01 Bluetooth speaker-mic on the T320. See MISC page for more info.
Using an external antenna to improve working range.
 (Image copyright P.Scott)
The T320 is supplied with a removable external LTE antenna. The standard antenna works well in most situations but can be replaced with 'high gain' external antennas. This means You can use it beyond normal coverage areas with an 800-2100MHz LTE antenna or relatively cheap 'car antenna' (with magnetic base for easy mounting on most vehicles) or even a flat panel LTE directional antenna array to greatly extend the operating range. Especially handy when using T320 as network bridge for remote WiFi mesh networks.
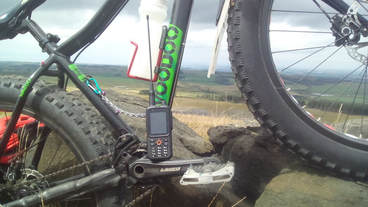
Image: My Inrico T320 with 'home brew' high gain Quad-band LTE antenna.
Data connection maintained on 800MHz (LTE band 20) 1068ft AMSL 5.5 miles from cell tower site. Stable connection providing over 30Mbps down and up.
The 'home brewed' antenna in this picture was just one iteration of many experimental test models built after extensive study of both commercially produced and theoretical designs for a multi-band PIFA (Planar Inverted F Antenna) with additional 800MHz elements.
The antenna shown in the photograph above incorporated a 'sleeve dipole whip' resonant on LTE band 20 that proved to be a reasonable performer (5.5miles from cell tower site) This design suffered due to negative interaction effects with the Tri-band PIFA fitted in the base housing of the antenna. This was most probably due to small errors during construction having a cumulative de-tuning effect on critical elements of the complete antenna array.
Later revisions use a shorter whip section resonant on 800MHz (LTE band 20) that has a different coupling arrangement. This has greatly improved performance managing to sustain a stable data connection at range of 10.5 miles from the cell tower.
( stable 4G connection with data rates consistently above 40Mbps during multiple tests in various weather / propagation conditions )
I personally enjoy developing and experimenting with custom antenna designs for fun but I know that most people will be happier to purchase a 'ready made' commercially produced high gain antenna to extend their working range.
Note: The Inrico T199 antenna works very well as a replacement antenna on the T320.
For those who like to experiment with antenna design there are plenty of possible antenna designs to be tried and tested.
Making Your own antennas for the mobile phone bands is not as forgiving as making antennas for HF, VHF, UHF bands.
The higher the frequency, the smaller the antenna. Smaller dimensions require higher accuracy during construction and finer precision adjustments.
Some antenna arrays have taken well over 100 iterations to achieve satisfactory results. This requires a great deal of time and patience.
More than just a handheld network radio
The Inrico T320 has many uses other than as a network radio for two-way simplex communications.
Time lapse video of summer sunrise peaking through a slow moving layer of cloud.
Recorded using the built-in rear facing camera on my Inrico T320 network radio.
This video was also uploaded using the 4G data connection on the T320 (GiffGaff SIM on O2 network 3.5miles from cell tower) as this is significantly faster and more reliable than the internet connection via our home internet service provider. When our home internet service fails, which happens often in poor weather conditions, I use the WiFi hotspot on the T320 to connect other devices, TM-7, T199, N60, Laptop etc..
UPDATE: We scrapped out home internet service provider and now use 4G data service for our home internet connection. We use a 4G router with external high gain flat panel antenna array. This has proved to be faster and much more reliable than other services available in our area.
