|
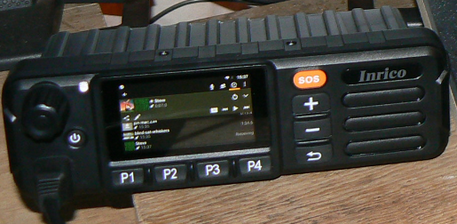
Inrico TM-7GSM/2G/3G/WiFi
Network Radio Transceiver |
Inrico TM-7 Specifications
Model: TM-7
CPU Frequency: 1.2 GHz
Platform: Microtek MTK 6572A
Operating System: Android 6.0 'Marshmallow'
RAM: 512M+4GB (Optional: 1GB+8GB)
Extended Memory: Up to 32Gb : Internally fitted SDcard (use high speed SDcard for best performance)
Screen TP display: IPS2.45” 240*320 : Works with 'Capacitive' touch screen stylus.
Input Power: 12-24V: Operates perfectly from regulated DC PSU or external battery from 8.4V DC to 24V DC
Internal Speaker: 45mm diameter speaker, 4W
Headset port: 3.5mm jack. Note: Plugging a headset into the headset port on left side of radio does Not mute the internal speaker.
USB: Micro USB 5-pin socket (for data cable/OTG cable)
Microphone: External Plug-In 'fist mic'. Condenser mic element with PTT switch & coiled 8 core shielded cable.
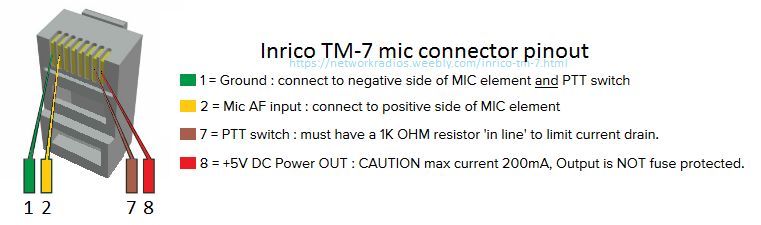
Mic Socket Type: 8 pin 'RJ45'
Mic Socket Wiring: Pin#1 GND : Pin#2 Mic AF input : Pin#7 PTT (1k resistor to GND) : Pin#8 +5V DC output.
RF Network Bands:
WCDMA/HSPA/HSPA+ Band 1 2100 MHz
GSM/HSPA/HSPA+ Band 8 900 MHz
+GSM 1800 MHz support
(HSPA and HSPA+ enhanced 3GPP 16-QAM modes)
Max RF Output Power:
GSM/HSPA/HSPA+ 900 MHz -32.2dBm ( 602 femtowatts)
GSM 1800 MHz -30.3dBm ( 933 femtowatts )
WCDMA/HSPA/HSPA+ 2100 MHz -23.5dBm ( 4466 femtowatts )
WIFI: 2.4GHz ISM band IEEE 802.11b/g/n (up to 150 Mbps)
Dimensions: 188mm x 58mm x 26mm
US Version Specifications for 2G / 3G : (Data source: FCC certification/compliance test report)
2G
RF Support Networks: GPRS (Class 12)
RF Bands: GPRS850 / GPRS1900
Uplink Frequencies:
GPRS850 824-849MHz
GPRS1900 1850-1920MHz
Downlink Frequencies:
GPRS850 869-894MHz
GPRS1900 1930-1990MHz
Max RF Output Power:
GPRS850 32.20dBm
GPRS1900 30.30dBm
Emission Types:
GPRS850 253KGXW
GPRS1900 250KGXW
Modulation Type: GMSK
Internal Antenna Gain:
GPRS850 0.2dBi
GPRS1900 0.7dBi
3G
RF Support Networks: WCDMA, HSDPA, HSUPA
RF Bands: WCDMA Band 2 WCDMA Band 5
Uplink Frequencies:
WCDMA Band 5 824-849MHz
WCDMA Band 2 1850-1910MHz
Downlink Frequencies:
WCDMA Band 5 869-894MHz
WCDMA Band 2 1930-1990MHz
Max RF Output Power:
WCDMA Band 5 23.20dBm
WCDMA Band 2 23.53dBm
Emission Types:
WCDMA Band 5 4M17F9W
WCDMA Band 2 4M19F9W
Modulation Type: BPSK
Internal Antenna Gain:
WCDMA Band 5: 0.2dBi
WCDMA Band 2 0.7dBi
Bluetooth
Version: V4.0 (EDR mode)
Data Rates: 1Mbps, 2Mbps, 3Mbps
Modulation Types: GFSK, Pi/4, QDPSK, 8DPSK
Channels: 79
Channel Separation: 1MHz
Frequency Coverage: 2402 - 2480 MHz
Max RF Power Output: 1.63 dBm (Conducted)
Internal Bluetooth Antenna: 1.3dBi
WiFi
WiFi Standard: 802.11b/g/n (HT20)
Frequency Coverage: 2412 - 2462 MHz
WiFi Standard: 802.11n (HT40)
Frequency Coverage: 2422 - 2452 MHz
Data Rates:
802.11b : 1 - 11 Mbps
802.11g: 6 - 54 Mbps
802.11n: 150 Mbps
Modulation Types: CCK, OFDM, QPSK, BPSK, 16QAM, 64QAM
Max RF Output Power: 14.20dBm (conducted)
Internal WiFi Antenna: 1.3dBi
WiFi Hotspot
The TM7 can also be used as a WiFi hotspot to allow other devices to access the internet via the TM7s mobile network data connection.
It also works well as a node on WiFi mesh networks with or without mobile network data connection.
CPU Frequency: 1.2 GHz
Platform: Microtek MTK 6572A
Operating System: Android 6.0 'Marshmallow'
RAM: 512M+4GB (Optional: 1GB+8GB)
Extended Memory: Up to 32Gb : Internally fitted SDcard (use high speed SDcard for best performance)
Screen TP display: IPS2.45” 240*320 : Works with 'Capacitive' touch screen stylus.
Input Power: 12-24V: Operates perfectly from regulated DC PSU or external battery from 8.4V DC to 24V DC
Internal Speaker: 45mm diameter speaker, 4W
Headset port: 3.5mm jack. Note: Plugging a headset into the headset port on left side of radio does Not mute the internal speaker.
USB: Micro USB 5-pin socket (for data cable/OTG cable)
Microphone: External Plug-In 'fist mic'. Condenser mic element with PTT switch & coiled 8 core shielded cable.
Mic Socket Type: 8 pin 'RJ45'
Mic Socket Wiring: Pin#1 GND : Pin#2 Mic AF input : Pin#7 PTT (1k resistor to GND) : Pin#8 +5V DC output.
RF Network Bands:
WCDMA/HSPA/HSPA+ Band 1 2100 MHz
GSM/HSPA/HSPA+ Band 8 900 MHz
+GSM 1800 MHz support
(HSPA and HSPA+ enhanced 3GPP 16-QAM modes)
Max RF Output Power:
GSM/HSPA/HSPA+ 900 MHz -32.2dBm ( 602 femtowatts)
GSM 1800 MHz -30.3dBm ( 933 femtowatts )
WCDMA/HSPA/HSPA+ 2100 MHz -23.5dBm ( 4466 femtowatts )
WIFI: 2.4GHz ISM band IEEE 802.11b/g/n (up to 150 Mbps)
Dimensions: 188mm x 58mm x 26mm
US Version Specifications for 2G / 3G : (Data source: FCC certification/compliance test report)
2G
RF Support Networks: GPRS (Class 12)
RF Bands: GPRS850 / GPRS1900
Uplink Frequencies:
GPRS850 824-849MHz
GPRS1900 1850-1920MHz
Downlink Frequencies:
GPRS850 869-894MHz
GPRS1900 1930-1990MHz
Max RF Output Power:
GPRS850 32.20dBm
GPRS1900 30.30dBm
Emission Types:
GPRS850 253KGXW
GPRS1900 250KGXW
Modulation Type: GMSK
Internal Antenna Gain:
GPRS850 0.2dBi
GPRS1900 0.7dBi
3G
RF Support Networks: WCDMA, HSDPA, HSUPA
RF Bands: WCDMA Band 2 WCDMA Band 5
Uplink Frequencies:
WCDMA Band 5 824-849MHz
WCDMA Band 2 1850-1910MHz
Downlink Frequencies:
WCDMA Band 5 869-894MHz
WCDMA Band 2 1930-1990MHz
Max RF Output Power:
WCDMA Band 5 23.20dBm
WCDMA Band 2 23.53dBm
Emission Types:
WCDMA Band 5 4M17F9W
WCDMA Band 2 4M19F9W
Modulation Type: BPSK
Internal Antenna Gain:
WCDMA Band 5: 0.2dBi
WCDMA Band 2 0.7dBi
Bluetooth
Version: V4.0 (EDR mode)
Data Rates: 1Mbps, 2Mbps, 3Mbps
Modulation Types: GFSK, Pi/4, QDPSK, 8DPSK
Channels: 79
Channel Separation: 1MHz
Frequency Coverage: 2402 - 2480 MHz
Max RF Power Output: 1.63 dBm (Conducted)
Internal Bluetooth Antenna: 1.3dBi
WiFi
WiFi Standard: 802.11b/g/n (HT20)
Frequency Coverage: 2412 - 2462 MHz
WiFi Standard: 802.11n (HT40)
Frequency Coverage: 2422 - 2452 MHz
Data Rates:
802.11b : 1 - 11 Mbps
802.11g: 6 - 54 Mbps
802.11n: 150 Mbps
Modulation Types: CCK, OFDM, QPSK, BPSK, 16QAM, 64QAM
Max RF Output Power: 14.20dBm (conducted)
Internal WiFi Antenna: 1.3dBi
WiFi Hotspot
The TM7 can also be used as a WiFi hotspot to allow other devices to access the internet via the TM7s mobile network data connection.
It also works well as a node on WiFi mesh networks with or without mobile network data connection.
SIM card installation.
The TM-7 is a Dual-SIM device. There are Two SIM slots hidden under an access cover in the underside of the radio.
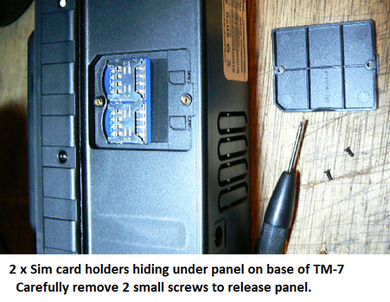
SIM card installation in Inrico TM-7 Network Radio. (Image copyright P.Scott)
Carefully place the sim with metal contacts facing the radio and gently slide SIM card(s) into the holder(s) making sure the SIM is correctly oriented (as shown above SIM1 / SIM2 slot identification text on the case) Gently slide SIM card into the holder (away from the slot identification text) until it stops fully 'home' against the top edge of the holder to ensure correct connection.
Replace the cover and secure cover in place with the two small screws before operation.
NOTE: If You intend to operate the TM-7 using WiFi connections only and do not want to use it on mobile networks You do not need to install a SIM card. The TM-7 will operate happily connected to Your home wireless access point or home WiFi router. For occasional portable operation You can tether it to a WiFi hotspot on another network radio, mobile phone or other portable WiFi hotspot device.
Internal SD card installation.

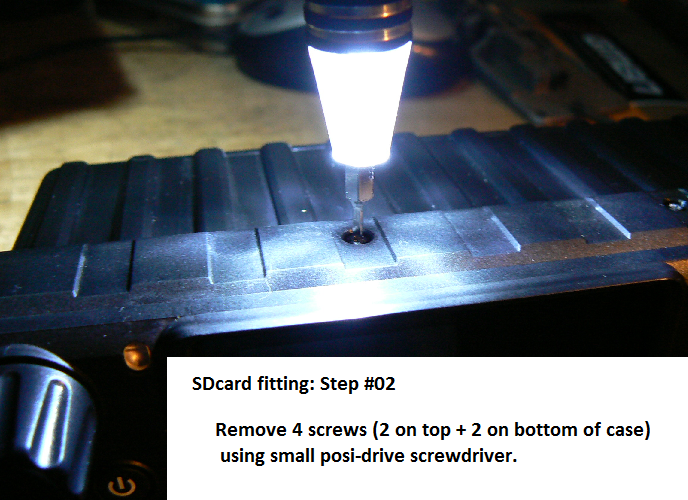

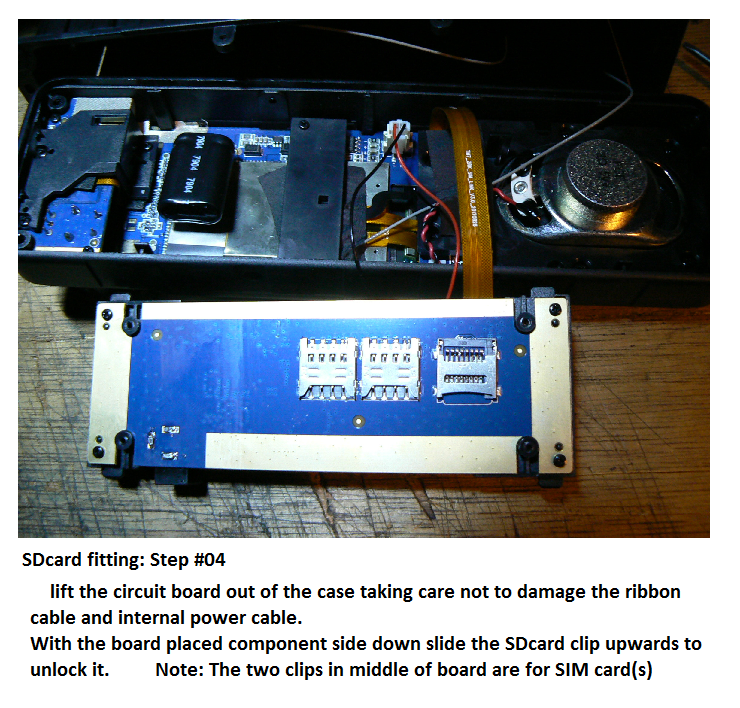
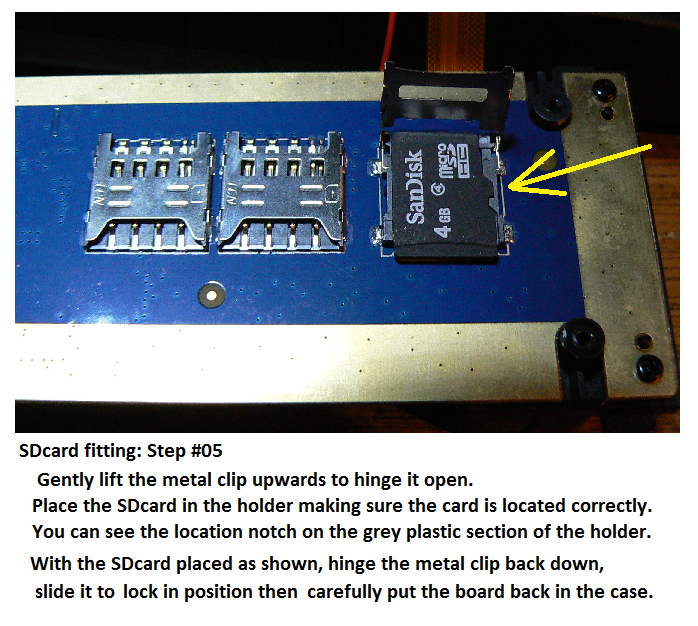
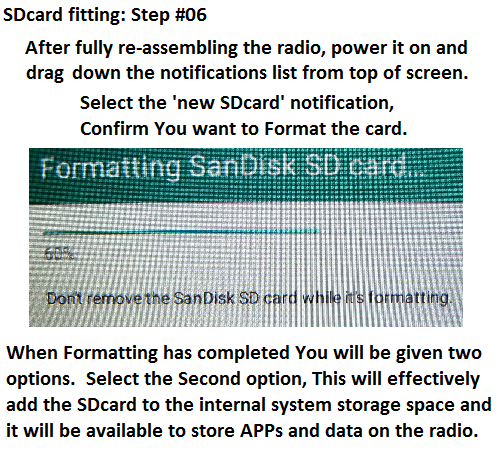
NOTE: The TM-7 will give You two options to format the new SDcard as #1 'removable storage' or as #2 'internal storage'.
Option #1 will format the card as a 'removable storage' device (like a USB stick) this is OK as secondary storage but not for APPs.
Option #2 will format the card and 'hook it into the operating system' as fixed internal storage that You can install apps directly into greatly expanding the size and number of APPs You can use on the network radio. : You can make large APPs and apps that require a lot of space (maps etc) use the SDcard and leave system APPs using the internal on-board storage.
When selecting an SDcard make sure You get a high speed SDcard (Class 10 or better) to ensure the system runs smoothly.
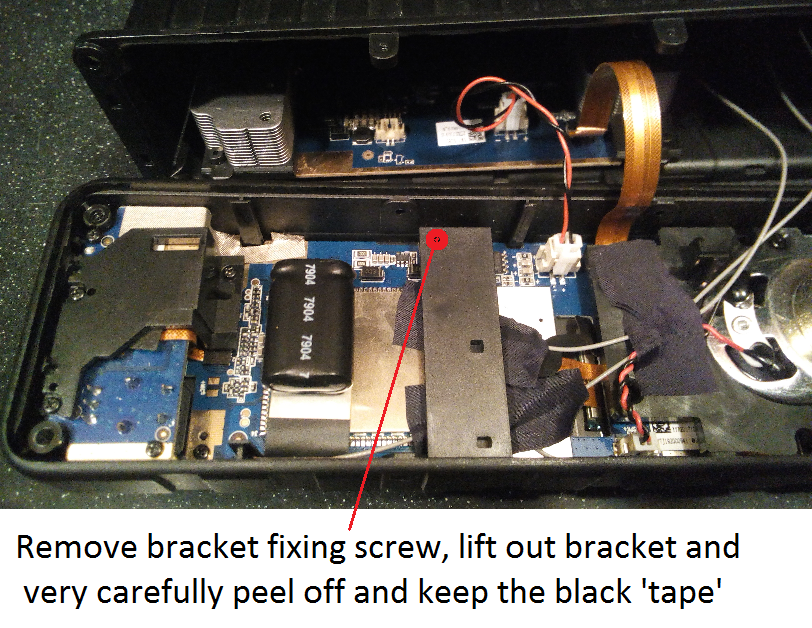
Hardware Modifications for Inrico TM-7 network radios.
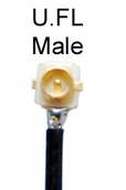
U.FL MALE type connector required to fit 2nd port on RF module in TM-7 network radio.
|
* NOTICE *
Any modification You make to Your equipment is done entirely At Your Own Risk. The U.FL micro connectors are very small, fiddly and can be damaged if not correctly aligned during fitting. If You are not entirely happy with performing any procedure or modification accurately and correctly I recommend getting someone else to do it who has experience with similar procedures involving very small high precision components or seeking assistance from someone who has worked with surface mount electronics. You are entirely responsible for safe use and legal operation of Your own equipment. |
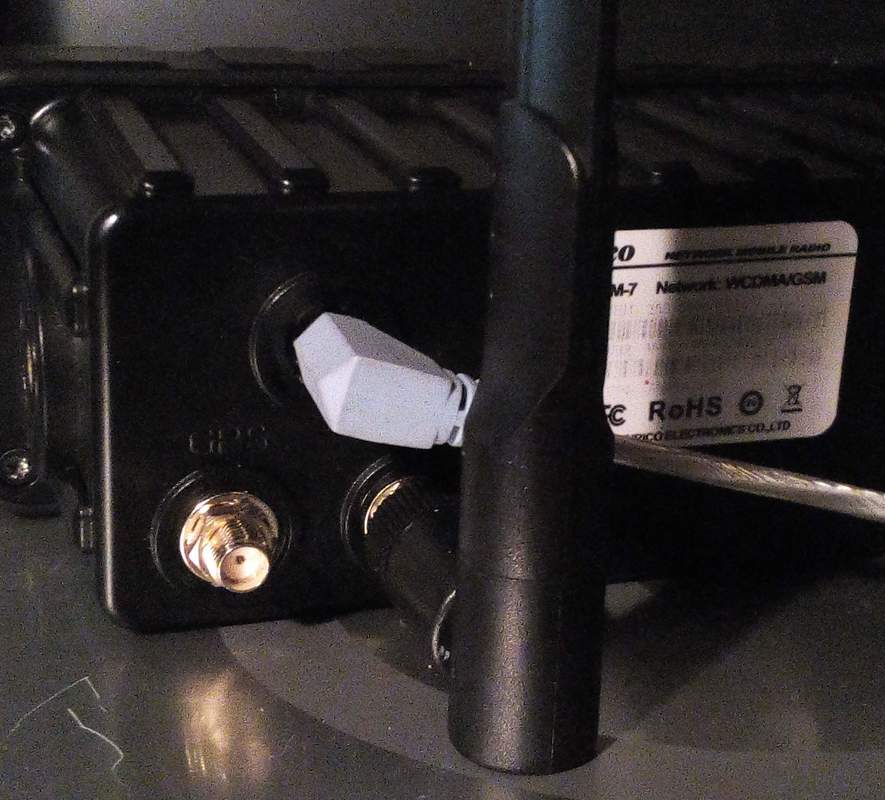
External GSM/2G/3G antenna socket.
A simple (but somewhat fiddly) modification to enable the external GSM/2G/3G antenna socket on TM-7 network radios.
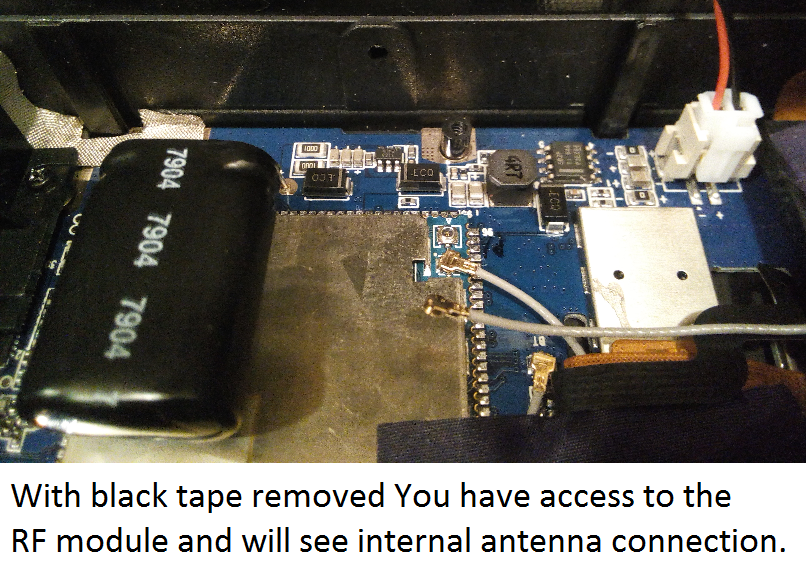


Fitting an external antenna is especially useful when operating the radio in a vehicle or location where network signal levels are poor.
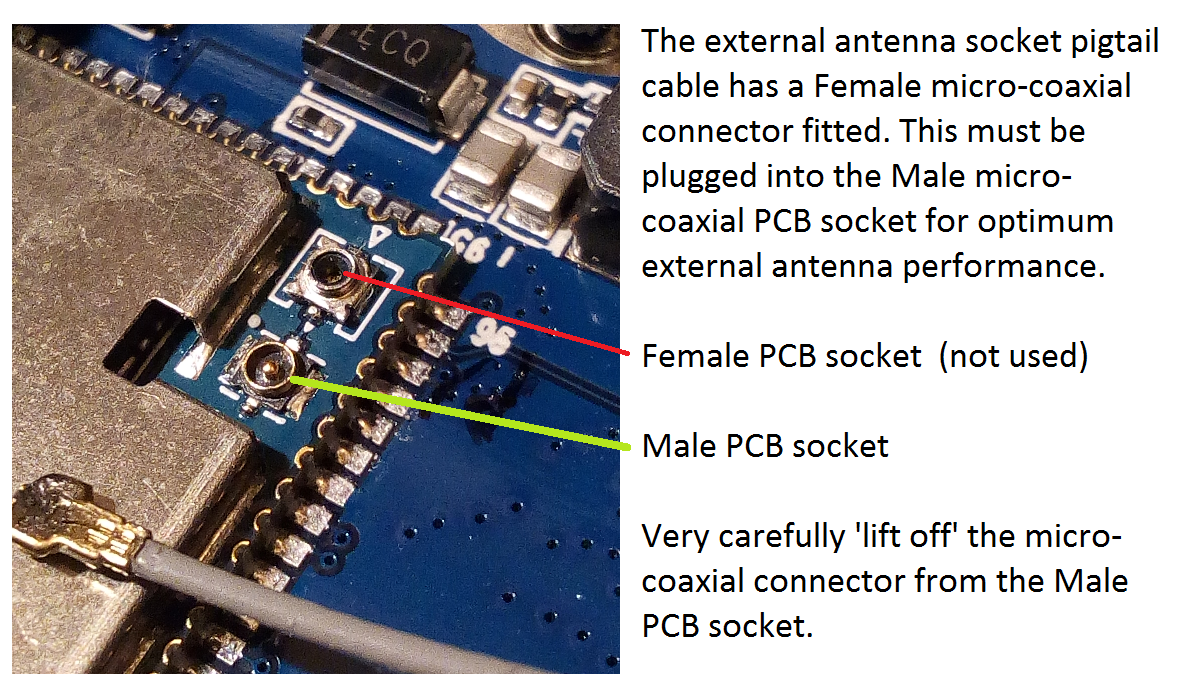
There are two micro-coaxial connectors on the RF module, as shown above. The TM-7 is manufactured with the Male PCB socket connected to the internal antenna and an external 'pigtail' coaxial cable from the external ANT socket on the rear of the radio. (external antenna 'pigtail' cable is not connected but is provided as an option to enable use of external antenna for in vehicle installation. The pigtail cable is usually secured inside the rear case section with tape at the factory to ensure it does not make contact with any circuitry or components if not used)
The basic modification disconnects the internal antenna and connects the Female micro-coaxial connector on the 'pigtail' for the external antenna socket (factory fitted but not connected) to the Male PCB connector on the RF module.
In this configuration You Must have an external antenna plugged in before powering on and attempting to operate the radio.
If You wish to move the TM-7 between operating locations, EG; Operating the radio in a vehicle installation with external antenna and also be able to unplug the radio power & antenna connections, remove it from the vehicle and operate elsewhere without an external antenna You will need to purchase a replacement pigtail cable with a Male U.FL micro-coaxial plug and connect it to the 2nd socket on the RF module (Female PCB mounted socket)
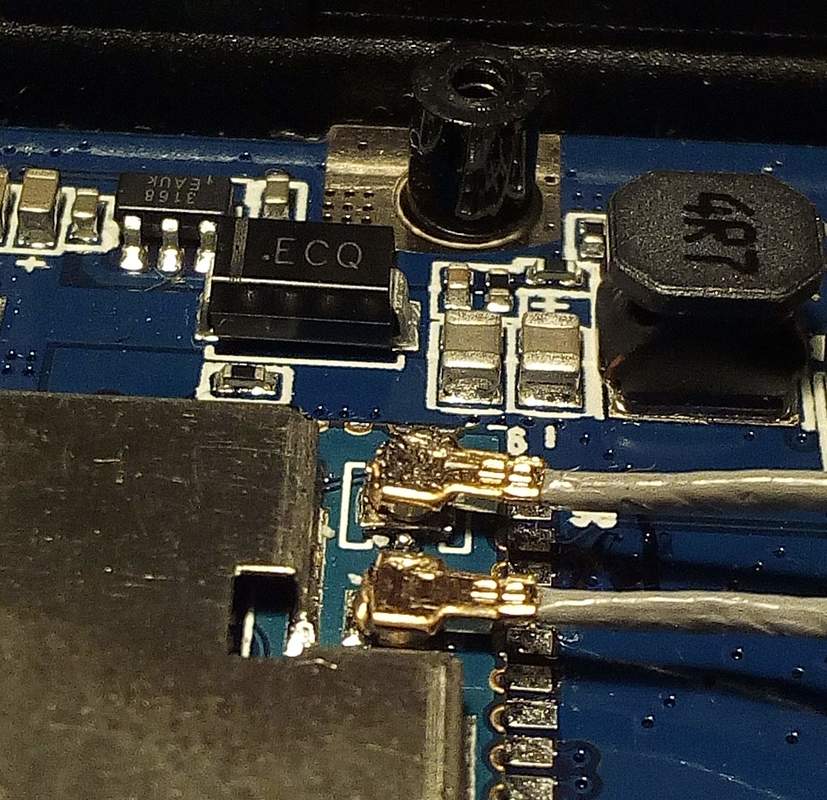
Important Notes
With the external socket connected and the internal antenna disconnected.
Do NOT attempt to operate the TM-7 on GSM/2G/3G cell-phone data connection without an external GSM/2G/3G cell-phone antenna plugged in as this may damage the output section of the RF module. You can safely operate the radio via 2.4GHz WiFi connections with no GSM/2G/3G antenna attached as long as You have either No Sim inserted or if You have SIM(s) inserted You have the SIM(s) switched Off.
With both the external socket connected and internal antenna still connected (as shown below)
You can operate with or without external GSM/2G/3G antenna plugged in depending on location and network signal coverage.
TM-7 standard mic Notes:
The standard 'fist mic' supplied with the Inrico TM-7 provides very good quality audio with excellent frequency response for speech.
(Image copyright P.Scott)
|
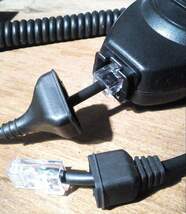
The TM-7 microphone cable connection is a standard RJ45 type plug/socket.
This is the same type as used on Ethernet network communications cables. If You find the standard curly cable is not long enough for You chosen installation location You can unplug the curly cable from the mic by pulling back the rubber sheath down the mic cable, pressing the lock tab down and removing the mic cable from the mic body. You can then simply use a standard 'straight through' CAT6 Ethernet network cable plugged into the mic body and the TM-7 instead of the curly cable supplied with the mic. (use a good quality fully shielded cable, most cheap CAT-5 cables will pickup interference) |
A few operators have experienced problems getting the mic plug to 'latch into' their TM-7 properly.
When pushing the mic plug into the socket on the radio You should hear a 'click' when the plug has been pushed in far enough to Lock into the socket.
If You do not hear a 'click' and the mic plug has not latched into the radio the rubber shroud is located too close to the mic plug and is stopping the mic plug from going far enough into the socket to 'lock in place' properly.
You will need to slightly adjust the location of the rubber shroud on the mic cable to allow the mic plug to be pushed fully home in the mic socket.
This is easily done by pulling the rubber shroud down the mic cable away from the mic plug a little at a time until the mic plug latches into the socket.
The standard TM-7 mic also has a strong spring on the PTT button that some operators find too strong to hold during long transmissions.
There are two methods of fixing this if required.
#1 Hardware modification: You can open up the mic and reduce the length of the spring to make the PTT button easier to hold in.
#2 Software configuration: Set the 'hardware PTT button' to 'Toggle' in the Zello settings/ Options/ Push-to-talk buttons/ menu.
The PTT switch on the mic will then act like a 'mic lock', Instead of holding the PTT to talk, You push it once to go into Transmit mode and when finished talking push the PTT button again to switch back into Receive mode.
The hardware modification is the best option but if You do not want to open Your mic the software 'toggle' may be better for You.
The only thing when using the Toggle mode is that You have to get used to pressing the PTT to go back to receive mode when You have finished Your transmission.
Using a desk mic on the TM-7
 Classic Leson desk mic on the TM-7 connected with home brewed interface cable. (Image copyright P.Scott)
I have been using a classic Leson desk mic on the Inrico TM-7
( TM-7 RJ45 8 pin mic plug to 4 pin inline mic socket adapter cable )
The Leson TW232 desk mic is a solid old favourite.
The cast metal base, column and mic housing are quite weighty.
The large black bar is the PTT switch,
The lever on the right is the 'Mic Lock' (mechanical PTT toggle)
The rotary knob on the left is the microphone gain control.
The mic gain circuit is powered by a 9V battery (MN1604 type) fitted in the base unit.
(Image copyright P.Scott)
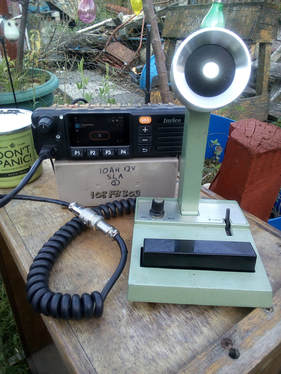
Using the TM-7 with External Power Supplies & Batteries
The TM-7 is designed to be used as a mobile network radio device in a vehicle powered by the vehicles 12V or 24V DC power system or used in a fixed location as a home/office 'base station' network radio powered by en external 12V DC power supply. It does not have an internal battery and has an internal voltage regulator circuit that will accept a range of voltages from an external DC power supply or external battery with the internal regulator providing the required voltages to the internal circuitry for stable operation of the radio.
Although the specifications state the power requirement is 12 to 24 volts DC, The TM-7 will operate correctly using power from an external battery or regulated DC power supply from 7.4 to 24 volts.
In the shack the TM-7 is powered from the shack 12V battery bank (charged from amorphous silicon solar panels)
In the house I use a 12V DC power supply. (when the mains power drops out I use batteries instead)
I have used the TM-7 for mobile operation with power supplied by various different batteries including;
7.4V Baofeng UV5R 1,800mAh battery pack.
8.4V NiCd battery pack (from an old radio controlled car)
9V MN1604 type battery (for a short duration)
18V 'power block' with 16 x 2100mA AA cells (for almost a whole day of near continuous operation)
12V SLA (sealed lead acid) battery pack (various different SLA batteries with various capacities from 3.5Ah to 10Ah for long durations)
I have also 'bench tested' the TM-7 using power provided by a 24V DC 'truck' battery supply and lab power supplies.
'Mountain Bike Mobile' operation with TM-7 powered by external 12V SLA battery.


Inrico TM-7 network radio fitted on my customised VooDoo Wazoo FatBike for 'mountain bike mobile' operation off road around Ayrshire & the Galloway hills. I use this setup to map out the coverage area of several cell-phone towers and extend working range with external antennas.
Power is supplied to the radio from a 12V SLA battery mounted on rear carrying rack providing over 36 hours of relatively heavy use.
My network radios are also used for GPS location, tracking and mapping during off-road rides with GPS tracker APP running in the background recording elevation, speed, distance, heading, track, waypoints etc. I also have signal monitoring APPs in the background to record and map cellular network coverage of cell-tower sites while Zello runs in the foreground for Global 2-Way PTT communications.
Battery life could be extended by using Zello on its own without GPS, mapping, tracking and cell signal monitoring APPs running in the background.
note: I use the TM-7 directly mounted on the handlebars when weather is dry and continued to operate with no problems with the radio enclosed in a heavy gauge plastic bag when caught in a thunder storm up in the hills several miles from home!
(always pays to have a backup plan, just in case conditions deteriorate)
Using TM-7 hardware rotary control to change channels on Zello.
The hardware rotary control knob can be used to select Zello channels on the Inrico TM7
(This also works on Anysecu W2 / Radiotone RT5 and other rebadged Inrico TM7, TM7+ and TM8 network radios)
You will need to install the Button Mapper app and make a donation to the developer to use the PRO features. (broadcast intent)
In Button Mapper (donation/paid version)
Select ADD button and turn the rotary knob a click to the Left,
This will add the button and allow You to program three settings for the button.
You need to program all three settings, Single Tap, Double Tap and Long Press: with the same Action.
Select 'Action' and set 'Broadcast Intent' to com.zello.intent.channelDown ( Down must have a capital D ).
Now ADD button and turn the rotary knob a click to the Right,
Now program the button Action for all three settings (Single, Double and Long press) setting 'Broadcast Intent' to, com.zello.intent.channelUp ( Up must have a capital U )
Rename the channels you want to select so they start with numbers (You can use 00 or 01 as first channel number)
00 channel name,
01 channel name,
02 channel name,
etc..
If You also want to select friends in Your Contacts list using the rotary selector,
Rename the chosen contact so it starts with a suitable number.
Make sure You only have one channel or contact starting with each number.
You will now be able to select the channels (and contacts) You renamed in numerical order by turning the hardware rotary control knob.
* A big Thank You to NR001 Filip for the programming information.
- Handy Android APPs -
As the TM-7 runs Android 6 operating system there are many applications that can be installed and used on this device.
NOTE: The applications shown on this page also work well on many other network radios, tablets and phones.
NOTE: The applications shown on this page also work well on many other network radios, tablets and phones.
Airdroid
AIRDROID This is a free APP available in the Google Play Store that will let You see the screen from Your network radio on Your PC, manage all the files and apps on Your radio and install APK files from Your PC into the radio.
With Your network radio connected to Your local area network (LAN) via WiFi and Your PC connected to Your LAN either via WiFi or an Ethernet cable.
Download and install AirDroid on the TM-7. Run AirDroid on the TM-7, after a few seconds You will be presented with available connection options. Select "AirDroid Web" this will display an IP Address on the TM-7 screen.
Open a web browser on any PC connected to Your local network and type the IP address into Your browser on the PC.
This will pop open a request window on Your radio screen, Once You Allow the connection the device manager display will appear in Your browser window on the PC.
You can now manage the files and applications on Your network radio from the browser window on Your PC.
To see the live screen display from Your radio on the PC . . .
Click on the ' Screenshot ' icon (looks like a pair of scissors)
A window will pop up on the Radio screen, select "Start Now"
You will now have a live video display of the screen from Your network radio in Your browser window on the PC.
You can also expand the live display to full screen on the PC. When operating full screen there is a vertical slider on the right hand side that allows You to adjust the update speed and bandwidth used for video streaming to suit Your requirements and LAN speed.
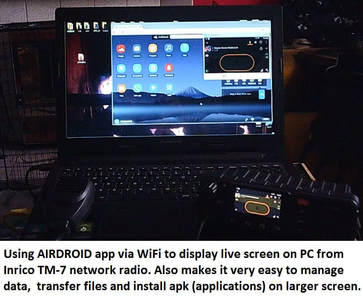
Airdroid app used to display live TM-7 screen in window on PC over WiFi WLAN connection. (Image copyright P.Scott)
|
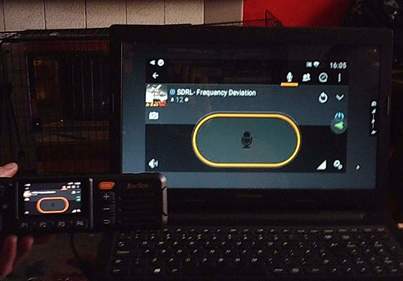
Airdroid app used to display live TM-7 screen on PC over WiFi WLAN connection. (Image copyright P.Scott)
|
Full control of the TM-7 from Your PC screen.
You can use an Android remote control program to your computer such as Total Control. - click HERE to go to sigma-rt website - which will allow You to use a large window on Your PC screen to see the live screen output and operate the TM-7 using the keyboard and mouse on Your PC. This is especially useful for operators who have trouble using the on screen keyboard when setting up the device or using applications that are hard to see on the small screen, such as echolink, webSDR on browser etc..
Note: You will need to use a 5 pin micro USB to Type-A USB (standard PC USB socket) cable to connect the radio to Your PC.
After plugging in the USB cable, drag down the notifications from the top of the TM-7 screen and change the USB connection type to 'File Transfer' mode. You can now run the Total Control software on the PC and follow the instructions and prompts provided.
I personally use Total Control on many Android devices but some people prefer the Vysor software instead. click HERE to go the the Vysor.io website
I suggest that You try both and see which one You prefer to use.
Important APPs for safety/security and WiFi stability
There are two APPs that I consider to be essential on all Android devices, network radios, mobile phones, tablets, navigation units, in vehicle entertainment systems, smart watches, etc that are connected to the internet over mobile and/or wifi networks.

NetGuard Firewall and Best WiFi Keeper Android APPs help keep Your device secure and 'on-air'.
#1: NetGuard - no-root Firewall : by MARCEL BOKHORST
This is essential to improve device security. Providing You with the option to block/allow access to the internet through WiFi and mobile connections for user installed & 'baked in' (factory installed) applications. More importantly the firewall can be used to stop hidden applications (and spyware) from sending data out to external IP addresses.
Setup: After installing NetGuard and giving it all requested permissions go to the 'Advanced Options' and turn on the 'Manage System Apps' feature then You can select which individual applications and system tasks are allowed to access the internet via WiFi and mobile network connections.
How to check for and Block the FotaProvider 'spyware / backdoor installer' on Android devices using Netguard.
Go into the netguard settings (via three vertical dots at top right of netguard screen) select 'Settings' then 'Advanced Options' and Enable 'Manage system apps' by sliding the switch at the right hand side to turn it on. Return to the netguard app list using your device 'back' button.
Scroll down the list on the netguard app list checking for 'FotaProvider' If You have this app in Your device tap on both the Wifi and Mobile Data icons on the right hand side to Block the FotaProvider spyware from being able to use Your Wifi and Mobile data connections. This effectively stops the 'FotaProvider' spyware being able to send 'collected data' from Your device to unknown organisations over the data connection and Blocks it from downloading data from external sources without notification.
** NetGuard is a powerful Firewall Application, Please read up on how to use NetGuard and be careful which other system tasks/Apps You allow/deny network access to. Depending on what Apps You use some hidden 'background tasks' are required for correct operation of Your device and many others are Not required.
It is important that You research any applications/system tasks You see listed in Your device that You do not know about before deciding to block/deny their internet access. The specific apps found in Your device will depend on the OS version, what software has been 'baked in' on the factory flashed ROMs and user applications installed.
#2: Best WiFi Keeper : by MARIOBILE
I consider this as an essential App If You use WiFi access points, hotspots or WiFi mesh networks.
* If You only use mobile network connections You do not need this App *
This application helps to keep Your WiFi connection alive, stopping the random WiFi device reset/drop problems experienced by many users of mobile phones and network radios with Android OS. If You have had random WiFi drop-outs on Your Android device even though You are well within Your WiFi coverage area and the actual WiFi signal strength has not reduced, Best WiFi Keeper will greatly reduce WiFi drop-out/connection reset problems on most devices.
NetGuard settings for people using built in WiFi Hotspot and/or Mesh networks.

Open NetGuard and go into NetGuard menu, select settings/ network options/
then Turn ON the 'Subnet routing' and 'Allow tethering' functions.
This works very well on the Inrico TM-7 and T320 network radios with multiple devices connected to hotspot.
Whether or not a particular HotSpot setup works depends on specific Android version in Your device.
Some Android versions have a bug that stops the tethering service and the VPN service working together.
Some devices force the WiFi device to 'hibernate' when the screen is off, preventing tethering from working. This behavior can be disabled in the Android enhanced/advanced Wi-Fi settings on most devices with the hibernate 'feature'.
How to Factory Reset the TM-7
To perform a Factory Reset on Your TM-7
Long press the Power button to turn the TM-7 off, unplug power cable, wait a few seconds.
Plug power cable in then Press the power button while holding rotary control knob pressed in.
Keep holding rotary button pressed in until it boots up showing 'Android Recovery'
Long press the Power button to turn the TM-7 off, unplug power cable, wait a few seconds.
Plug power cable in then Press the power button while holding rotary control knob pressed in.
Keep holding rotary button pressed in until it boots up showing 'Android Recovery'

|
Android Recovery Mode.
If You have a 'De-Bloated' ROM in Your TM-7 You may get an English language display. ( Image shown here is rotated 90 degrees, it will be 'sideways' on Your TM-7 screen ) To perform a factory reset from the Android Recovery screen, use the + and - (volume buttons) to move highlighted line down to "Wipe data/factory reset" then short press the power button once. This will clear all user data and restart the TM-7 with Factory Default settings. |
If You have an Inrico 'Factory ROM' in Your device you will see a blue screen with Chinese characters on it.
Navigate to line that has 'eMMC' shown on it and tap on that line.
Then go to very last line (bottom of list) and tap on that line.
This will clear all user data, set everything back to the factory default settings and Re-Boot the TM-7.
Navigate to line that has 'eMMC' shown on it and tap on that line.
Then go to very last line (bottom of list) and tap on that line.
This will clear all user data, set everything back to the factory default settings and Re-Boot the TM-7.
